Last updated on
Learn how to effectively extend your kitchen island for more space and functionality.
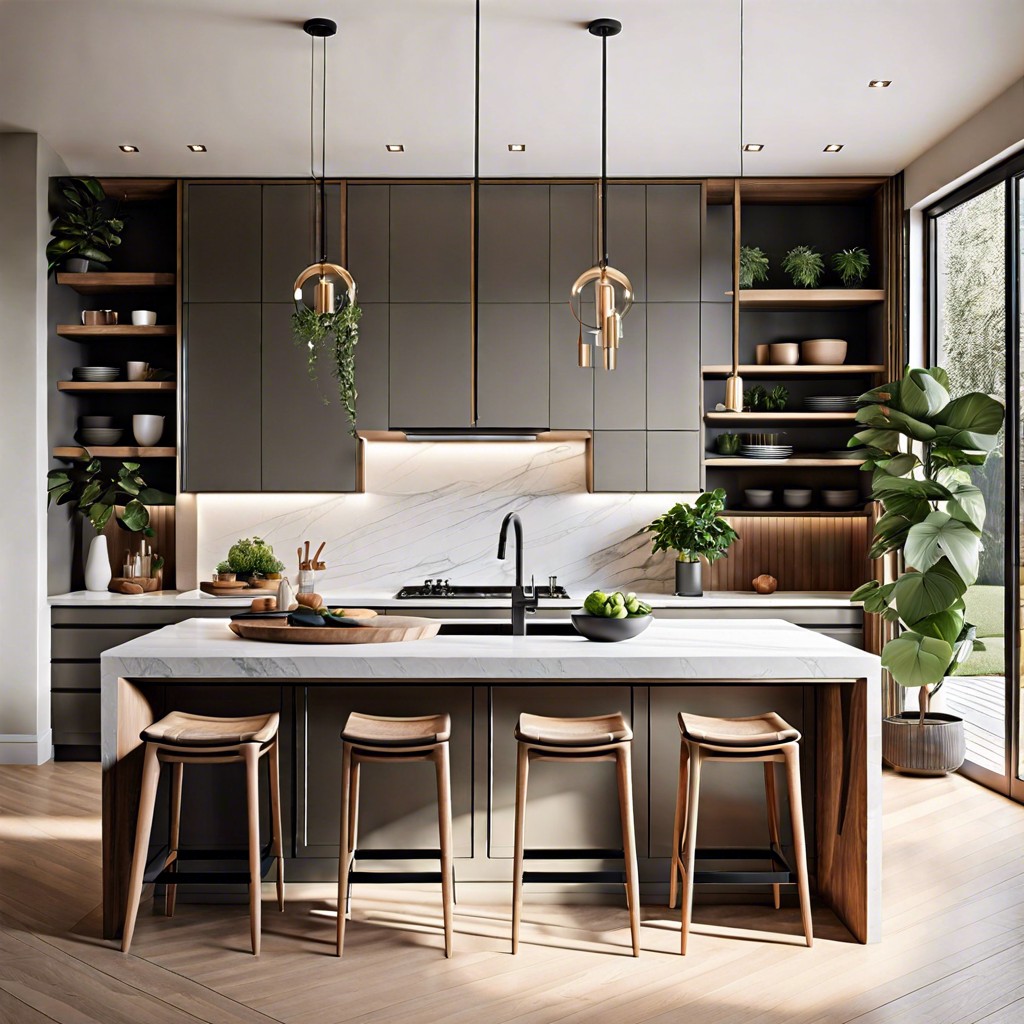
Dreaming of more elbow room in your kitchen? A perfectly planned kitchen island extension can transform your culinary chaos into a masterpiece of functionality and style. In this article, we’ll guide you through understanding your island’s purpose, sizing up your space, matching or contrasting countertops, and infusing clever storage solutions. Let’s turn that dream into a delectable reality, one step at a time.
Key takeaways:
- Determine your extension’s purpose for maximum functionality.
- Measure space for flow and clearance considerations.
- Choose design and materials that complement your kitchen.
- Add storage solutions for organization and clutter-free space.
- Ensure structural stability with support legs and fasteners.
What's Inside
Determining the Purpose of Your Island Extension
Got a food prepping station that feels more like a tightrope walk than a workspace? Or maybe you need a secret weapon to hide those countless gadgets. An extension can be your kitchen’s superhero without the cape!
First, figure out if you need more countertop space for rolling out pizzas like a high-end pizzeria or just a sleek bar area to impress your guests. It’s all about knowing how you’ll maximize this newfound real estate.
Thinking about extra storage? Consider adding cabinets or open shelving. Perfect for showcasing those ceramic bowls you splurged on during a weak moment.
Need seating? Picture your family gathering around the island, with bar stools that don’t look like they belong in an interrogation room.
Got kids? Make part of it a homework station. Just make sure there’s room for snacks because, let’s be real, snacks are essential for homework.
Lastly, remember that this isn’t a one-size-fits-all situation. Think about your unique needs and quirks. It’s your kitchen—make it work for you, not the other way around.
Measuring Available Space
Start by pulling out that measuring tape like a pro. Grab a piece of paper and jot down the dimensions of your current kitchen island and the surrounding area. Don’t forget to account for walking space. No one wants to play kitchen Tetris every time they grab a snack.
Think about how the extension will affect the flow of your kitchen. Consider the doorways, appliances, and other islands of culinary joy. Remember that a spacious feel makes chopping onions a bit more bearable.
Recommended clearances include leaving at least 36 inches of walking space around the extension. If you’re planning to include seating, aim for 24 inches of elbow room per person. Trust me, nobody enjoys eating while feeling like a sardine in a can.
By being meticulous now, you avoid headaches later. Think of it as preemptive headache-avoidance.
Choosing a Compatible Design
Finding a design that harmonizes with your current kitchen can be quite the adventure! First, consider the style of your existing kitchen: modern, rustic, or perhaps a touch of vintage charm. Matching isn’t always mandatory—contrasting styles can add a pop of personality, like pairing a sleek granite extension with classic wooden cabinets.
Color schemes play a crucial role. An extension that complements your kitchen’s color palette will create a seamless look. Imagine a dark wood island against a backdrop of white-washed walls. Gorgeous, right?
Don’t forget about the materials. Sticking to similar textures can make the extension feel like it’s always been part of your kitchen. If your countertops are marble, a marble-topped extension maintains consistency.
Shape matters too. A rectangular island supports a linear, streamlined kitchen, while a round or oval design softens sharp angles and adds flow. Think of it as matchmaking, but for furniture!
Selecting Matching or Contrasting Countertops
Matching countertops can create a seamless look, ideal for a cohesive and polished kitchen. It’s like finding the perfect pair of shoes that just completes your outfit. Go for materials that blend with your existing island, like granite or quartz, for a harmonious vibe.
On the flip side, contrasting countertops can inject some flair into your kitchen. Think of it as wearing a snazzy tie with a classic suit. Imagine a bold butcher block extension on a sleek marble island. Instant character boost. Just ensure the contrasting elements complement each other rather than clash like socks and sandals.
Consider the overall color scheme of your kitchen. If you lean towards a neutral palette, a pop of color can energize the space. For vibrant kitchens, a subtle contrast can calm things down while still adding interest.
Keep functionality in mind when making your choice. For a durable and scratch-resistant option, quartz is your best pal. Want something with warmth and charm? Butcher block’s your guy. Make sure the countertop not only looks good but also fits your cooking and lifestyle needs.
So, mix and match wisely, like a chef crafting the perfect salad – balanced, flavorful, and just the right amount of crunch.
Adding Storage Solutions
Islander with a mess of spices and gadgets? Don’t worry, there’s a solution for you.
First, install cabinets or drawers underneath the new extension. They’re perfect for pots, pans, or even that collection of quirky coffee mugs.
Consider adding pull-out shelves or hidden compartments. These can stash away utensils or cutting boards without compromising the sleek look of your island.
Open shelving is another great option. It lets you display fancy dishes or cookbooks, adding both style and functionality.
Finally, don’t forget hooks on the sides. Hang towels, ladles, or whatever keeps going AWOL in your kitchen.
It’s all about maximizing space while keeping things you need within reach.
Attaching Additional Legs for Support
When adding an extension, support is a big deal – nobody wants a saggy island, right? Here are some tips to keep things upright:
First, make sure your new legs match the aesthetics of your kitchen. You don’t want your island looking like it’s got mismatched socks!
Choose materials that can handle the weight. Metal or sturdy wood are both excellent choices. Avoid anything that looks like it might buckle under the pressure of a heavy lasagna pan.
Position the legs strategically. Place them at the corners of your extension or evenly spaced along the length for balance. Think of them as the pillars holding up your culinary empire.
Consider adjustable legs, especially if your kitchen floor has some uneven spots. Adjustable legs allow you to tweak the height for perfect stability.
And here’s a little secret: you can even paint the legs to match your cabinets or go for a funky contrasting color if you’re feeling adventurous. It’s all about making your kitchen extension both functional and fabulous.
Integrating a Cantilever Countertop
Consider the futuristic flair a cantilever countertop can add to your kitchen. Picture this: an extended surface that appears to float with no visible supports underneath. Magic? No, just smart design.
First, go for sturdy brackets. These hidden heroes are anchored into the wall or existing island base. Make sure they’re steel. No shortcuts here.
Next, the countertop material matters. Opt for quartz or granite. They’re not just about looks; both are as tough as your grandma’s secret cookie recipe.
Finally, balance is key. Keep heavy objects off the edge. Your cantilever should be long enough to be useful but short enough to defy gravity without a sweat.
Voila, a sleek, space-efficient addition that turns heads and handles breakfast like a champ.
Incorporating Seating for Additional Functionality
Imagine transforming your kitchen island into the new favorite hangout spot in your home. Adding seating is the way to go. Think cozy bar stools, sleek bench seating, or even a couple of high chairs for the little ones.
Start by assessing how many seats your space can handle. A good rule of thumb is allocating about 24 inches per stool to keep everyone comfortable and avoid elbow wars at breakfast. Go ahead, measure twice.
Choose seating that complements your kitchen’s style. If your kitchen boasts a modern aesthetic, cool metal stools can be a hit. For a rustic vibe, warm wooden benches might be more your thing. Got a quirky side? Mix and match styles for a unique flair.
Don’t forget height! Standard counter height stools are about 24-26 inches tall, while bar height stools stand at 28-30 inches. Measure your island’s height before shopping, unless you want your guests to feel either like giants or hobbits.
Consider backless stools if space is tight. They can easily tuck under the island, keeping the area uncluttered. Bonus: Your toes won’t get stubbed on stray chair legs.
Remember, comfy seating can turn your kitchen into a conversational hub during parties. After all, who wants to miss out on the action while cooking up a storm?
Finally, think about cushion! Hard seats might look stylish, but a comfy tush is a happy tush. Adding plush cushions can make an impromptu kitchen gathering last longer than expected (in a good way!).
Utilizing Portable Kitchen Carts
Portable kitchen carts are like the Swiss Army knives of your kitchen—versatile and handy! Unlike fixed extensions, they offer flexibility. Simply roll them in when needed and tuck them away when not.
Think of them as secret agents on wheels, ready to tackle your culinary tasks. They typically come with shelves, drawers, or baskets, providing extra storage. You can even use the top surface as additional prep space.
Opt for a style that compliments your existing island. Wooden carts generally blend well with various decors, while metal ones add a modern touch.
Consider one with locking wheels for stability during food prep—no one wants a runaway cart when they’re chopping onions!
Looking to mix things up? You can even get carts with built-in wine racks or butcher blocks. So much functionality packed into a mobile unit!
Ensuring Structural Stability
Making sure your kitchen island extension doesn’t end up as a wobbly disaster is crucial. Nobody wants their masterpiece crashing down mid-chop. Here are some must-know tips to keep that island rock solid.
Firstly, consider the weight distribution. Heavy granite countertops need sturdier support than lightweight laminate. Don’t skimp on this; your casserole collection depends on it.
Adding extra support legs can be a life-saver. If your extension is sizable, those extra legs can prevent any embarrassing mishaps when it’s fully loaded with Thanksgiving dinner.
Use fasteners and brackets efficiently. Choose high-quality, heavy-duty options to connect the extension securely to the main island. Think of it as the kitchen’s version of super glue.
If you’re feeling fancy, consider adding a steel frame beneath the extension. This trick will give it superhero strength, perfect if you often host large dinner parties or have little climbers at home.
Lastly, level your island religiously. Grab that bubble level and ensure every part sits evenly. An uneven island is a recipe for tilted cakes and sliding pizzas.
Stay savvy with these tips and your kitchen island extension will be the reliable helper you’ve always dreamed of!
Read More
 Is World Central Kitchen a Good Charity for Your Donation
 How to Prevent Cuts in the Kitchen: Your Hands Will Thank You
 15 Creative Ways on How to Display Cutting Boards
 How to Remove Kitchen Countertop: A Step-by-Step Guide to Revamp Your Space
 How Much Does It Cost to Rent a Commercial Kitchen: A Guide to Budget-Friendly Cooking Spaces