Last updated on
This article provides a step-by-step guide on creating your own kitchen cabinets, complete with free plans to help you from start to finish.
Key takeaways:
- Cabinet dimensions: Base cabinets are 24″ deep and 34.5″ tall.
- Materials: Use hardwood plywood for strength and solid wood for face frames.
- Tablesaw tips: Use a clean, sharp blade and measure consistently.
- Assembly: Lay out pieces, use clamps, and employ pocket screws.
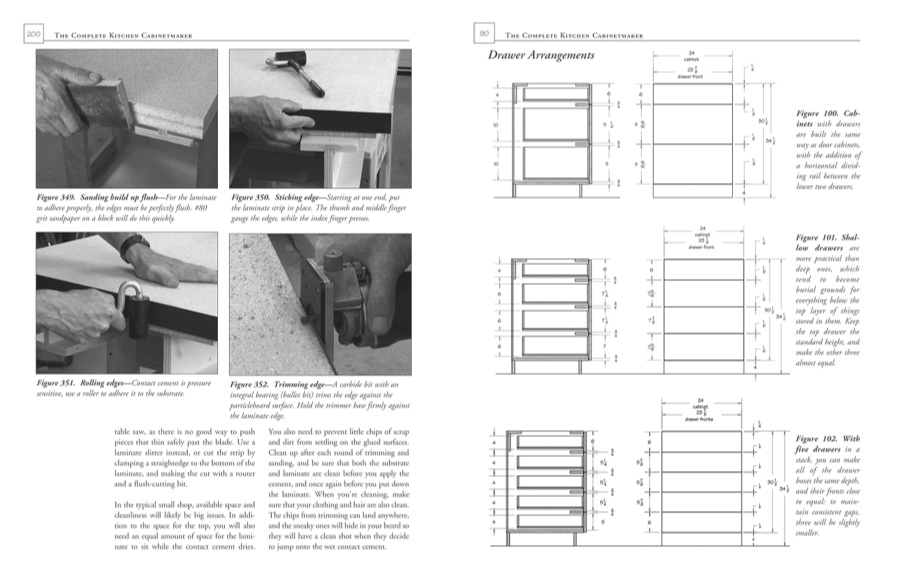
- Drawer tips: Choose mounting mechanism, pay attention to measurements, and use strong joinery techniques.
What's Inside
Begin With the Right Cabinet Dimensions
Understanding standard dimensions is the cornerstone of cabinet construction. Here’s how they come into play:
- Base cabinets are typically 24 inches deep and 34.5 inches tall. Add a countertop, and the overall height reaches 36 inches. This is a comfortable working height for most tasks.
- Upper or wall cabinets generally start at 54 inches above the finished floor. This leaves about 18 inches of space between the countertop and the bottom of the upper cabinets, providing ample room for small appliances and the necessary elbow room for food preparation.
- The standard width for cabinets can vary, typically starting at 9 inches and increasing in 3-inch increments up to 48 inches. Selecting the width of your cabinets should hinge on the available space and storage needs of your kitchen.
- When planning for kitchen storage, consider the sizes of items you’ll be storing. Pots and pans require wider cabinets, while narrow pull-outs can be perfect for spices.
- Be mindful of door and appliance clearances when plotting cabinet placement. Ensuring doors can fully open without obstruction is key to a functional kitchen layout.
Precision in these measurements will make the installation process smoother and ensure your kitchen is both aesthetically pleasing and fully functional.
A Word About Materials
Selecting the perfect materials is crucial for the success and longevity of your kitchen cabinets. Hardwood plywood comes as a go-to choice for cabinet boxes given its strength and ease of cutting. For the face frames, consider solid wood, as it offers durability and a classic look that can be painted or stained.
When it comes to the back panel, a thinner plywood or even hardboard can suffice, especially if the cabinet will be anchored to the wall—this can also save on costs without compromising stability. Melamine-coated particleboard is another option for the cabinet interiors owing to its smooth, easy-to-clean surface, though it can add weight and may require special fasteners and adhesives.
Remember to factor in the material thickness, typically ¾ inch for most cabinet boxes and shelves, to ensure your cuts and plans accommodate the right dimensions. Keep in mind that drawer slides and cabinet hinges will attach best to certain materials, so match your hardware accordingly.
Opt for materials that balance cost, functionality, and aesthetics to bring your vision for your kitchen space to life. Investing in good quality materials may have a higher upfront cost but can pay off in the longer term with sturdier and more enduring cabinets.
Make a No-fuss Case Using Your Tablesaw
The tablesaw is your ally in ensuring precision and saving time when building cabinet cases. Here’s how to maximize its benefits:
Start with a clean, sharp blade to make pristine cuts without splintering the wood. Opt for a high-tooth count blade for finer cuts, ideal for visible cabinet parts. Remember, the right blade can make a significant difference in the finished look.
Setting the proper fence distance is crucial. Measure from the blade to the fence to confirm the width of your cabinet sides, shelves, and bottom. Consistent measurements are key. Double-check before each cut.
Use featherboards and push sticks to maintain control over your material. They keep your fingers safe and help produce more accurate cuts by applying steady pressure, ensuring the wood remains flush against the fence.
Cut dadoes and rabbets in cabinet parts with a dado set if available. These joints provide additional strength and make assembly straightforward, ensuring shelves and cabinet backs fit snugly.
Mind the blade height, setting it just above the thickness of your stock. This minimizes tear-out and increases safety, giving you better control of the workpiece during the cut.
The mitre gauge is handy when cross-cutting any non-lengthwise pieces. Always ensure it’s square to the blade, and use a cross-cut sled for larger panels to enhance stability and precision.
By prioritizing accuracy and safety while using the tablesaw, you build a strong foundation for your kitchen cabinet project — quite literally. These steps, while seemingly simple, contribute to a professional-looking outcome.
Putting It All Together
Once the individual cabinet pieces are cut to size and the materials are prepared, the assembly can begin. Remember, precision is key to making sure cabinet parts fit together seamlessly and function properly.
Start by laying out the pieces on a flat surface to visualize the cabinet structure. Use woodworking clamps to hold the pieces together. This will help maintain stability during the process and prevent the structure from shifting, which could lead to misalignment.
Employ pocket screws for a strong joinery method that’s also hidden from view. These screws are great for holding the frame together without external hardware being seen.
When attaching the back panel to the carcass, make sure it’s squared. This not only ensures a true and accurate fit within the cabinet structure but also reinforces the rigidity of the whole cabinet.
Apply wood glue at each joint during assembly, but use it sparingly – too much glue can be messy and may not add to the strength of the joinery.
After glue and screws, make sure to wipe off any excess glue before it dries to maintain a clean look and avoid any bumps on the wood surface after sanding.
Connect face frames to the cabinet carcass with more pocket screws or with biscuits and glue for a seamless appearance. Face frames give strength to the structure and provide a mounting point for doors and hardware.
Finally, always double-check that your doors and drawers are square within your frame. Once attached, properly align and install hardware to ensure smooth operation.
Keep in mind that patience and attention to detail during assembly will pay off with a professional-looking end product.
How to Take the Horrors Out of Drawers
Drawers can often be the trickiest part of building kitchen cabinets, but with some planning and precision, you can simplify the process. Start by deciding on the mounting mechanism. Undermount slides are hidden and allow for full drawer extension, but side-mount slides are easier to install and adjust.
Next, pay careful attention to the measurements. The drawer box should be 1 inch less in width than the cabinet opening and at least 1/2 inch less in height. For a smooth operation, precise cuts are crucial. Using a table saw can ensure uniformity in sizing your drawer pieces.
Assembly is best done with simple but strong joinery techniques. Dovetail joints are the hallmark of quality, but for a diy approach, butt joints with screws or dowels are perfectly effective when reinforced with glue.
Choose material wisely for the drawer base; it should be sturdy but not too heavy. Plywood is often a great choice because of its strength and stability.
Finally, remember that the finish is just as important as the structure. Sand all parts smoothly before assembly, and consider a pre-finish before installing the hardware to avoid marring the wood with glue or tool marks.
By tackling each aspect step by step, you can create functional, durable drawers that enhance your homemade kitchen cabinets.


