Last updated on
Discover essential tips and creative ideas for designing the perfect kitchen cabinet layout to maximize space and functionality.
Key takeaways:
- Flow: Create a pleasant “work triangle” with stove, sink, and fridge.
- Storage Needs: Plan for what you actually use and need.
- Countertop Space: More is better for big cooking projects.
- Cabinet Placement: Upper cabinets for everyday items, lower for less frequently used gadgets.
- Lighting: Use layered lighting for tasks and overall illumination.
What's Inside
Getting Started With Kitchen Layouts
Let’s dive right in. First things first, it’s all about maximizing space and functionality. You don’t want to be tripping over the dog while reaching for the flour, right? Here’s what you need to think about:
- Flow: The kitchen needs to be easy to navigate. Imagine you’re whipping up your famous spaghetti; the stove, sink, and fridge should form a pleasant dance circle. This is your “work triangle.”
- Storage Needs: More shelves for the grandma’s china, fewer for that mountains of Tupperware lids no one can find the bottoms to. Think about what you actually use and plan accordingly.
- Countertop Space: More is better, especially if you’re a fan of big, messy cooking projects. Plenty of space is ideal for rolling out dough or hosting a bowl parade for salad assembly.
- Cabinet Placement: Upper cabinets for everyday items, lower ones for those Sunday-only gadgets like the bread machine or the ice cream maker.
- Lighting: No one likes chopping onions in the dark. Layered lighting helps. Use under-cabinet lights for tasks and ceiling lights for overall illumination.
And there you have it! These are the essentials to kickstart your kitchen layout planning. Everything else is just the cherry on top. Enjoy that plotting and scheming!
Basic Kitchen Layouts
Understanding the core kitchen layouts can significantly simplify your decision-making process when configuring your space. Each layout has its charm and functionality.
U-Shaped: Think of this as a cozy kitchen hug. Cabinets and appliances wrap around in a “U” shape, providing ample storage and workspace. Perfect if you like everything within arm’s reach without doing a kitchen marathon.
L-Shaped: Ideal for open floor plans. This layout fits snugly into a corner, leaving one side open for dining or an island. It’s a great space-saver and works well for both small and large kitchens.
Galley: Relatively simple and highly efficient. Two parallel walls house cabinetry and appliances, creating a narrow but functional cooking area. Great for serious chefs who appreciate a streamlined workflow. Also, it’s like the kitchen version of a catwalk. Vogue, anyone?
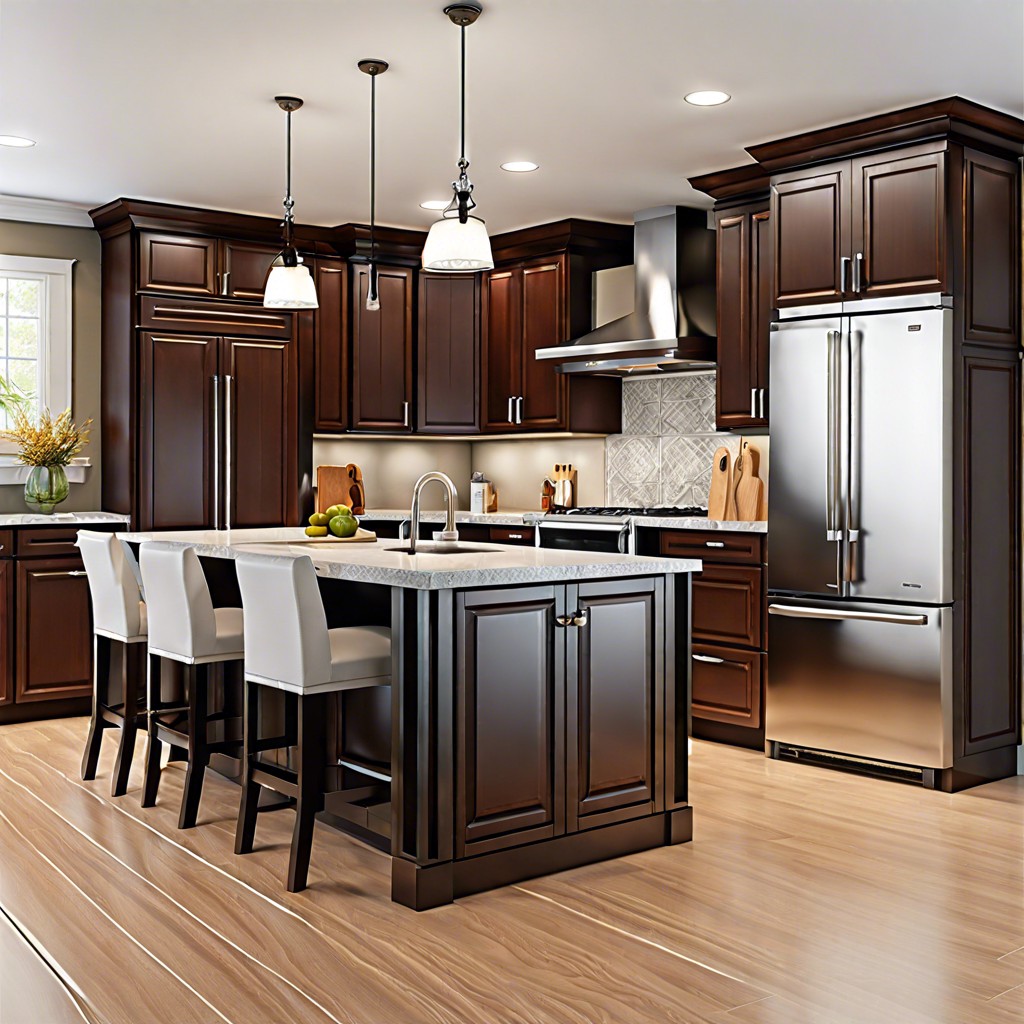
Island: Add versatility to any layout by incorporating an island. It provides extra counter space and can house additional appliances, like a sink or stove. Plus, it’s the perfect spot for breakfast, homework, or pretending you’re on a cooking show.
Each layout has unique advantages, making it easier to decide based on your cooking habits, family size, and entertaining needs.
U-Shaped Layout
Picture a cozy kitchen hug. That’s the U-shaped layout for you! Cabinets and countertops wrap around three walls, creating a snug workspace.
Maximizing storage is a strong suit here. With three walls to fill, you’ll have room for all your gadgets, gizmos, and grandma’s secret spice stash.
It’s perfect for keeping things within arm’s reach. Think cooktop on one wall, sink on another, and fridge across. Everything’s just a swivel away.
U-shaped kitchens can handle multiple cooks without too much elbow-bumping. More room means more helpers—or snacks while you cook.
Pro tip: Ensure enough space between opposite cabinets. You don’t want to get stuck doing the sideways shuffle every time you open a drawer.
With this layout, you control the stage. Just don’t get too wrapped up—literally!
L-Shaped Layout
With cabinets along two adjacent walls, the L-shaped layout offers flexibility and an open feel. It maximizes corner space, which often gets wasted in other configurations.
Here’s why it’s a winner:
- Great for Open Concept: Perfect for open floor plans, keeping sightlines clear.
- Efficient Work Triangle: Easier to create an efficient cooking zone, reducing steps between the sink, stove, and fridge.
- Versatility: Allows for various kitchen designs and adapts to both small and large spaces.
- Room to Add an Island: If the room is spacious, an island can be added for extra storage and work surface.
Picture this: effortlessly chatting with guests while whipping up dinner. Pure magic.
Galley Layout
Imagine walking into your kitchen and feeling like a gourmet chef in a narrow alleyway of delicious possibilities. That’s the magic of this layout. It’s perfect for smaller spaces.
Got a long, narrow kitchen? This layout optimizes space by placing cabinets and appliances along two parallel walls. It’s like a culinary runway where everything is within arm’s reach. Left to the stove, right to the sink, back to the fridge with a pirouette – dance moves optional.
Think of it as a food prep assembly line. Efficient and streamlined. No space is wasted, and you can maximize your storage by going vertical with your cabinets.
Just be mindful of traffic flow. It can easily become a one-person kitchen during busy times. So, if you and your sous-chef (aka spouse, kids, or cat) love to cook together, you might need a choreographed routine.
Island Layout
Ah, the beloved island layout. It’s like having a Swiss Army knife in the middle of your kitchen. Islands provide extra counter space, a spot for casual meals, and can even house appliances.
Got kids? Let them do homework on one side while you chop veggies on the other. Fancy a social cook? An island invites friends to gather ’round without getting in your way.
- A few handy tips:
- Ensure you have enough space to move around. Ideally, you want at least 3 feet of clearance on all sides.
- Islands aren’t just for rectangular kitchens. They can work wonders in L-shaped and U-shaped layouts too.
- Consider adding electrical outlets. Handy for small appliances, laptops, or keeping your phone charged while you cook.
Pro tip: Add a contrasting countertop color to your island to make it pop as a stylish focal point.
Work Triangles
The kitchen work triangle is all about efficiency. Picture it like a secret dance between the stove, the sink, and the fridge. These three points should form a triangle for smooth sailing as you whip up your culinary masterpieces.
First, keep each “triangle leg” between 4 and 9 feet. Anything more, and you’ll feel like you’re training for a marathon. Anything less, and you’ll stumble over your own feet.
Second, avoid placing obstacles like islands or trash cans in the triangle. You don’t want to turn dinner time into a ninja obstacle course challenge.
Third, ensure clear pathways around the triangle. Help your hungry kids and guests avoid bumping into you as they sneak around for snacks.
The goal is to make your kitchen feel like an extension of yourself. Efficient, graceful, and a bit magical.


