Last updated on
Discover the effective methods to boost your kitchen sprayer’s water pressure for a more efficient and powerful cleaning experience.
Have you ever been in the middle of washing dishes and noticed that the water pressure from your kitchen sprayer is weak? It can be frustrating, especially when you’re trying to clean tough stains or rinse off large pots and pans. But don’t worry, there are several ways to increase water pressure in your kitchen sprayer without having to call a plumber or spend a fortune on expensive equipment.
In this article, we’ll explore some simple yet effective methods that will help you boost the water pressure in your kitchen sprayer so you can get back to cleaning with ease. Let’s dive in!
What's Inside
Understanding Water Pressure
Water pressure refers to the force that pushes water through pipes and out of faucets or other fixtures. It’s measured in pounds per square inch (PSI), with most homes having a standard PSI range between 40-80.
Low water pressure can be caused by several factors, including clogged pipes, faulty valves or regulators, old plumbing systems, or even municipal supply issues. Identifying the root cause of low-pressure problems is crucial for finding an effective solution.
Identifying Low Water Pressure Problems
There are several reasons why you may be experiencing low water pressure, including clogged pipes or a malfunctioning faucet diverter valve. One way to determine if your kitchen sprayer is suffering from low water pressure is by checking other faucets in your home.
If all of them have weak flow rates, then there might be an issue with the main supply line or municipal service.
Another way to check for low water pressure problems is by inspecting any visible components on and around your kitchen sink area that could potentially affect its performance such as valves and hoses leading up to it.
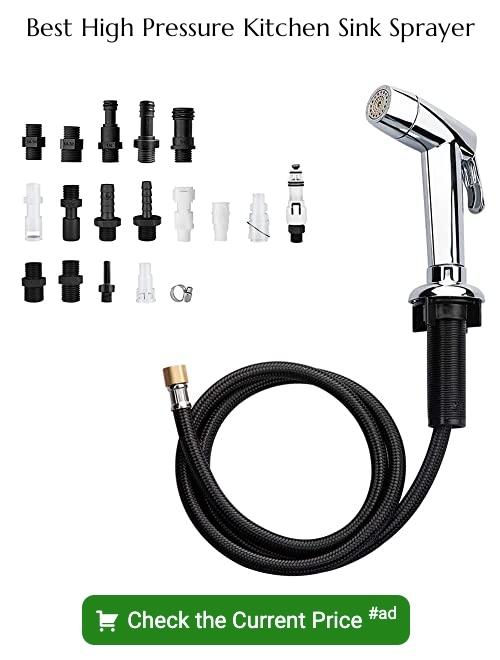
Inspecting Kitchen Sprayer Components
Start by turning off the water supply valves under the sink and removing any items stored beneath it. Next, detach the sprayer head from its hose and examine both parts for signs of wear or damage.
Check if there are any cracks or leaks on either component that could be causing low water pressure. If you notice any issues with these parts, replace them immediately to restore proper function.
Inspecting other components such as aerators can also help improve overall flow rate in your kitchen sink. Aerators are small mesh screens located at the end of a faucet spout that regulate airflow into a stream while reducing splashing.
If you find debris buildup on an aerator screen during inspection, remove it using pliers or a wrench before cleaning thoroughly with vinegar solution and reattaching back onto its position.
Cleaning Sprayer Nozzle
Over time, mineral deposits and debris can build up inside the nozzle, causing it to become blocked and reducing water flow. Fortunately, cleaning the sprayer nozzle is an easy fix that you can do yourself.
To clean your kitchen sprayer’s nozzle, start by turning off the faucet’s water supply valves under your sink. Next, unscrew or detach the spray head from its hose or base unit using pliers if necessary.
Once removed from its base unit or hose connection point inspecting it carefully will help identify any visible blockages such as dirt buildup on mesh screens around aerators which are easily cleaned with soap and warm running water.
For more stubborn blockages use vinegar solution (equal parts white vinegar & hot tap-water) soak for 30 minutes then rinse thoroughly with cold running tap-water before reattaching to its original position on either hose connection point/base-unit depending on model type used in your home.
Cleaning the Kitchen Sprayer Head
Over time, mineral deposits and debris can build up inside the nozzle, causing it to spray weakly or unevenly. Fortunately, cleaning your kitchen sprayer head is an easy task that you can do yourself with just a few simple tools.
To clean your kitchen sprayer head, start by turning off the water supply under your sink. Next, unscrew the cap on top of the nozzle and remove any loose debris or sediment that may have accumulated inside.
Then soak it in vinegar solution for about 30 minutes to dissolve any stubborn buildup.
After soaking it in vinegar solution rinse thoroughly with warm water before reassembling everything back together again.
Removing Clogs in the Faucet Line
Over time, mineral deposits can build up inside the pipes and restrict water flow. To remove these clogs, start by turning off the water supply to your kitchen sink.
Then, disconnect the sprayer hose from both ends using a wrench or pliers.
Next, use a small brush or toothbrush to scrub away any visible debris from both ends of the hose. If there are still stubborn clogs remaining in either end of it after cleaning with a brush then soak them overnight in vinegar solution (equal parts vinegar and warm water).
This will help dissolve any mineral buildup that may be causing low pressure.
Checking Faucet Diverter
The diverter valve controls the flow of water between the spout and sprayer, so if it’s not working correctly, you may experience reduced water pressure or no flow at all from your sprayer.
To check if your faucet diverter is causing the problem, start by turning off both hot and cold-water supply valves under the sink. Next, remove the spout from its base to access the diverter valve located inside.
Inspect for any visible signs of damage or wear on this component; replace it immediately if necessary.
Fixing Diverter Valve Issues
The diverter valve controls the flow of water between your faucet and sprayer. When it malfunctions or gets clogged with debris, it can cause a drop in water pressure.
To fix this issue, start by turning off both hot and cold-water supply valves under your sink to prevent any leaks or accidents. Next, remove the spout from its base by unscrewing its mounting nut counterclockwise using pliers or a wrench.
Once you’ve removed the spout from its base, locate the diverter valve inside of it. It should be located near where your kitchen sprayer hose connects to your faucet body.
Using needle-nose pliers or an adjustable wrench (depending on what type of fastener holds down), carefully remove any screws holding down this component before pulling out gently with care not to damage anything else around there while doing so!
Adjusting Pressure Regulator
The regulator controls the amount of water that flows through your pipes and into your home, so if it’s not working correctly, you may experience reduced water flow.
To adjust the pressure regulator, locate it near the main shut-off valve or where the main line enters your home. Turn off all faucets and appliances that use water to ensure an accurate reading.
Then use a wrench to turn the adjustment screw clockwise to increase or counterclockwise to decrease pressure.
It’s important not to set too high as this can damage plumbing fixtures and even burst pipes leading costly repairs down later on. If adjusting doesn’t work for you then consider replacing with new one which will be more efficient than repairing old ones.
By following these simple steps, you can easily adjust your kitchen sprayer’s water pressure without having to call in a professional plumber.
Adjusting the Water Pressure Regulator
The regulator is a valve that controls the amount of water flowing through your pipes and into your home. If it’s set too low, you’ll experience weak water flow throughout all faucets in your house.
To adjust the regulator:
- Locate Your Regulator: It’s usually located near where the main supply line enters into your home.
- Turn Off Water Supply: Before making any adjustments to avoid accidents or damage.
- Remove Cover: Use a wrench or pliers to remove its cover.
- Adjust Screw/Bolt: Using an adjustable wrench turn clockwise for higher pressure and counterclockwise for lower pressure until desired level is reached
- Replace Cover
It’s important not to over-adjust as this can cause high-pressure problems which can lead to leaks or burst pipes.
Adjusting a water pressure regulator requires some basic plumbing knowledge; if you’re unsure about how much adjustment should be made, consult with a professional plumber who will help ensure that everything is done correctly without causing further damage.
Replacing Water Supply Lines
Over time, old pipes can become corroded or clogged with mineral buildup, which restricts the flow of water. This can cause a decrease in pressure throughout your entire plumbing system.
Replacing old pipes is not an easy task and requires some plumbing knowledge. If you’re comfortable working with tools and have experience with DIY projects around the house, then replacing supply lines might be something that you could tackle on your own.
Before starting any work on replacing supply lines make sure to turn off the main valve for incoming water into your home as well as turning off power sources near where work will take place (if applicable).
Replacing Old Pipes
Over time, old pipes can become corroded and clogged with mineral deposits, which restricts the flow of water. If this is the case for you, replacing old pipes may be necessary to increase water pressure throughout your home.
Replacing old pipes can be a daunting task and should only be done by a licensed plumber. A professional will assess the condition of your current plumbing system and recommend whether partial or complete replacement is needed.
Partial pipe replacement involves removing only sections of damaged piping while leaving intact portions in place. This method is less invasive than full pipe replacement but may not solve all low-pressure issues if there are other underlying problems within the plumbing system.
Full pipe replacement involves completely removing all existing piping and installing new ones throughout your entire house or just specific areas where low-pressure issues exist. While more expensive than partial replacements, full replacements ensure optimal performance from every faucet in your home for years to come.
Installing a Water Pressure Booster
A booster pump is designed to increase the flow of water in low-pressure areas by increasing the overall system pressure.
Before purchasing a booster pump, make sure that it is compatible with your existing plumbing system and meets local building codes. You’ll also need to determine where you want to install the pump – typically near or on top of your main supply line.
Once installed, turn off all faucets and appliances that use water in your home before turning on the main valve again. This will allow for proper pressurization throughout your entire plumbing system.
While installing a booster pump may require some initial investment, it can significantly improve not only kitchen sprayer performance but also other fixtures around your home such as showers or washing machines.
Testing Water Pressure
Testing is a simple process that can be done with a gauge that measures PSI (pounds per square inch). You can purchase this tool at any hardware store or online.
To test your home’s water pressure, follow these steps:
- Turn off all faucets and appliances that use water.
- Locate an outdoor faucet or hose bib where you can attach the gauge.
- Remove any attachments from the faucet so only the gauge is attached.
- Open up the faucet completely to allow maximum flow of water through it.
- Read and record what appears on your PSI meter.
If your reading falls between 40-60 psi, then congratulations! Your home has normal levels of household plumbing systems’ standard operating range for optimal performance.
Troubleshooting Common Problems
One of the most common issues is a clogged aerator or spray head. To fix this problem, remove the aerator or spray head from your faucet and soak it in vinegar for several hours to dissolve any mineral buildup.
Another issue could be a faulty diverter valve that directs water flow between the faucet spout and sprayer. If this valve is not working correctly, it can cause low water pressure in both areas.
In such cases, replacing the diverter valve may be necessary.
If you notice reduced water flow throughout your home rather than just at one fixture like your kitchen sink sprayer; there might be an issue with old pipes or corroded plumbing fixtures that need replacement.
Reduced Water in Faucet
The aerator is the small mesh screen located at the end of your faucet that helps regulate water flow and prevent splashing. Over time, mineral deposits can build up on this screen and restrict water flow.
To clean the aerator, first turn off the faucet’s hot and cold supply valves under the sink. Then unscrew or gently pry off the aerator using pliers or a screwdriver.
Soak it in vinegar for about an hour to dissolve any mineral buildup before rinsing thoroughly with warm water.
Preventative Maintenance Tips
Here are some preventative measures you can take to keep your kitchen sprayer functioning optimally:
1. Clean the aerator regularly: The aerator is a small device located at the end of the faucet that helps regulate water flow and prevent splashing.
Over time, debris and mineral buildup can clog up this component, leading to reduced water pressure.
2. Check for leaks: Leaks in pipes or faucets can cause a drop in water pressure over time if left unaddressed.
3. Inspect supply lines: Supply lines connect your sink’s plumbing system with its main source of freshwater supply; they should be checked periodically for any signs of wear or damage.
4. Replace old pipes: If you have an older home with outdated plumbing systems, consider replacing them as they may not be able to handle modern-day demands on their own.
Regular Maintenance for Optimal Performance
This will not only help prevent low water pressure issues but also extend the life of your sprayer. Here are some tips on how you can maintain optimal performance:
1. Clean the nozzle regularly: Over time, mineral deposits and debris can build up in the nozzle, causing a decrease in water pressure.
To avoid this problem, clean the nozzle with a soft brush or toothbrush every few months.
2. Check for leaks: Leaks not only waste water but also reduce water pressure in your kitchen sprayer over time.
Inspect all connections and joints regularly for any signs of leakage.
3. Replace worn-out parts: If you notice that certain components such as O-rings or washers are damaged or worn out, replace them immediately to prevent further damage.
4. Schedule professional maintenance checks: It’s always good practice to have a professional plumber inspect your plumbing system annually even if there is no visible issue present yet.
When to Call a Professional
A licensed plumber has the expertise and tools necessary to diagnose and fix any underlying issues that could be causing low water pressure in your home’s plumbing system.
If you’re not comfortable working with plumbing components or don’t have experience fixing these types of problems, it’s best to leave it up to a professional. Attempting DIY repairs without proper knowledge or training can lead to further damage or even injury.
While there are several ways homeowners can troubleshoot low water pressure issues with their kitchen sprayers on their own; sometimes calling a professional is necessary for optimal performance. Don’t hesitate – reach out for help from an experienced plumber who will get your kitchen back up-and-running at full capacity!
FAQ
How do I fix low water pressure in my kitchen sink sprayer?
To fix low water pressure in your kitchen sink sprayer, unscrew the spray head from the hose, turn on the water, and if pressure is good from the hose, clean the spray head or remove and clean the check valve.
Why does my sink sprayer have low pressure?
Your sink sprayer may have low pressure due to either a clogged aerator or a clogged cartridge, both of which affect water flow.
Why is the water flow slow in my kitchen faucet?
The water flow is slow in your kitchen faucet likely because the aerator is clogged with mineral crumbles and debris.
What steps can be taken to improve the water pressure in my kitchen sprayer?
To improve the water pressure in your kitchen sprayer, clean or replace the aerator, check for kinks in the hose, and ensure the water valve is fully open.
Can a clogged aerator cause low pressure in a kitchen sink sprayer?
Yes, a clogged aerator can cause low pressure in a kitchen sink sprayer.
Are there any specific tools or techniques to enhance the water flow in a kitchen faucet?
To enhance water flow in a kitchen faucet, one can clean or replace the aerator, check for kinks in the pipes, or adjust the water pressure valve.


