Last updated on
Explore unique wall shutter decor ideas because they can effortlessly transform an ordinary space into a rustic and charming haven.

These are my unique design concepts made using design tools. I hope you find them inspiring!
Venturing beyond the traditional realm of wall decor, this article explores innovative and unique ways to incorporate wall shutters into your home decor. Instead of sticking solely to tried-and-true approaches, we’ll be charting new territories, casting light on fresh, distinctive ideas to invigorate your home decor experience.
Don’t fret, if those well-known ideas still capture your heart, there will be plenty of resources attached at the end of this article. But why not first take a voyage with us through this rich sea of inventive wall shutter decor ideas. You might discover some inspiring new perspectives that could transform the way you perceive wall shutters.
So, tie your creativity to the mast and sail into these extraordinary decor concepts. Who knows what amazing discoveries await?
What's Inside
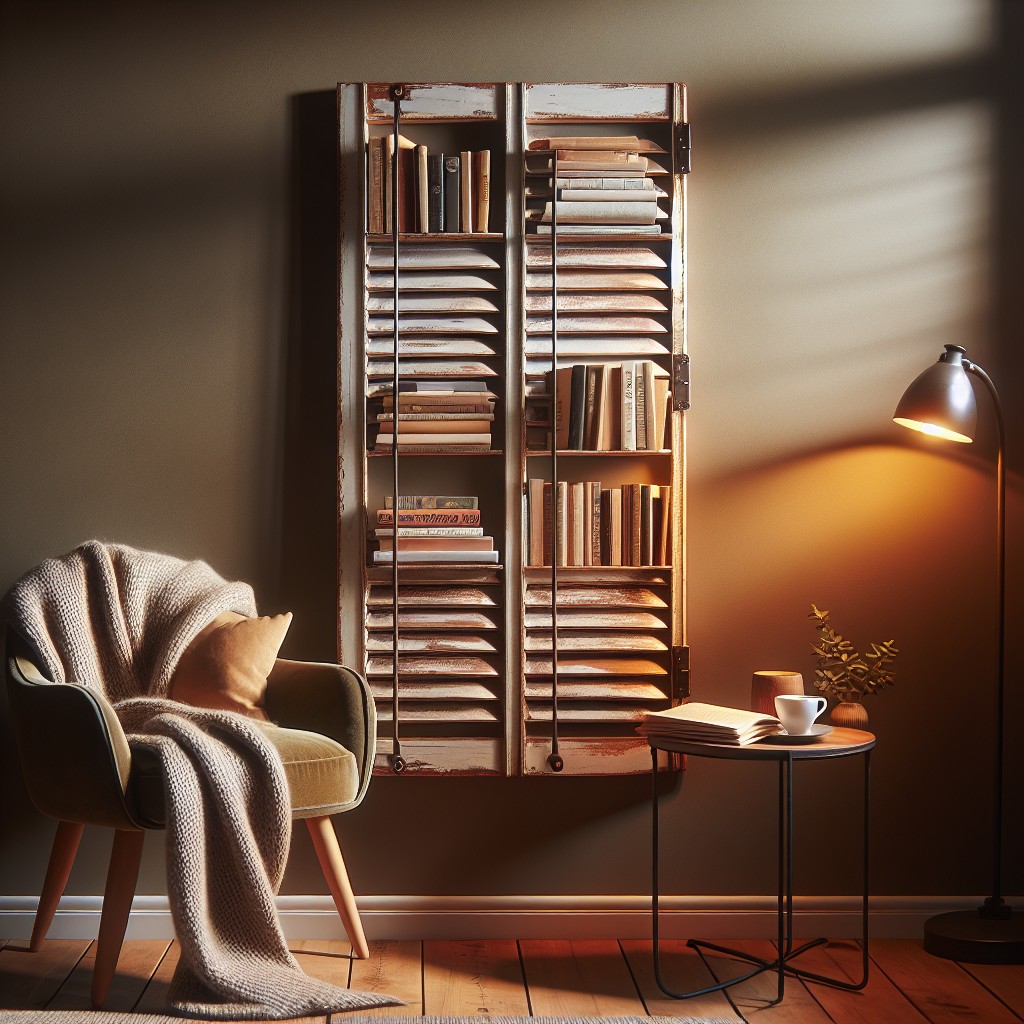
DIY Shutter Bookshelf for a Vintage Library Look

Creating your own bookshelf using wall shutters can bring a wonderful vintage twist to your library. Here’s how.
1. Select Two Identical Wall Shutters: They should be tall enough to house your books and sturdy enough to hold their weight. Antique themed shutters will give an extra vintage edge.
2. Clean and Paint: Deep clean the shutters to remove any dirt. Paint in your desired color, preferably neutral shades like white, brown, or cream to keep the vintage vibe.
3. Attach Shelves: Measure the distance between the shutter slats and cut wooden planks accordingly. Secure these planks onto the shutter slats with nails. These will act as shelves for your books.
4. Secure Shutters: Stand the shutters against your wall and secure in place using screws or wall brackets. Always double-check stability before placing books on the shelves.
5. Decorate: Use vintage items such as an old globe, antique vase, or artsy bookends to decorate the bookshelf.
By following these steps, you’ll have a functionally charming shutter bookshelf in no time. Such a unique piece is sure to impress any visitor and serves as a chic ode to a time diverse in literary classics. Remember, every piece you create can be a conversation starter that reflects your style and taste.
Innovative Shutter Photo Display Idea
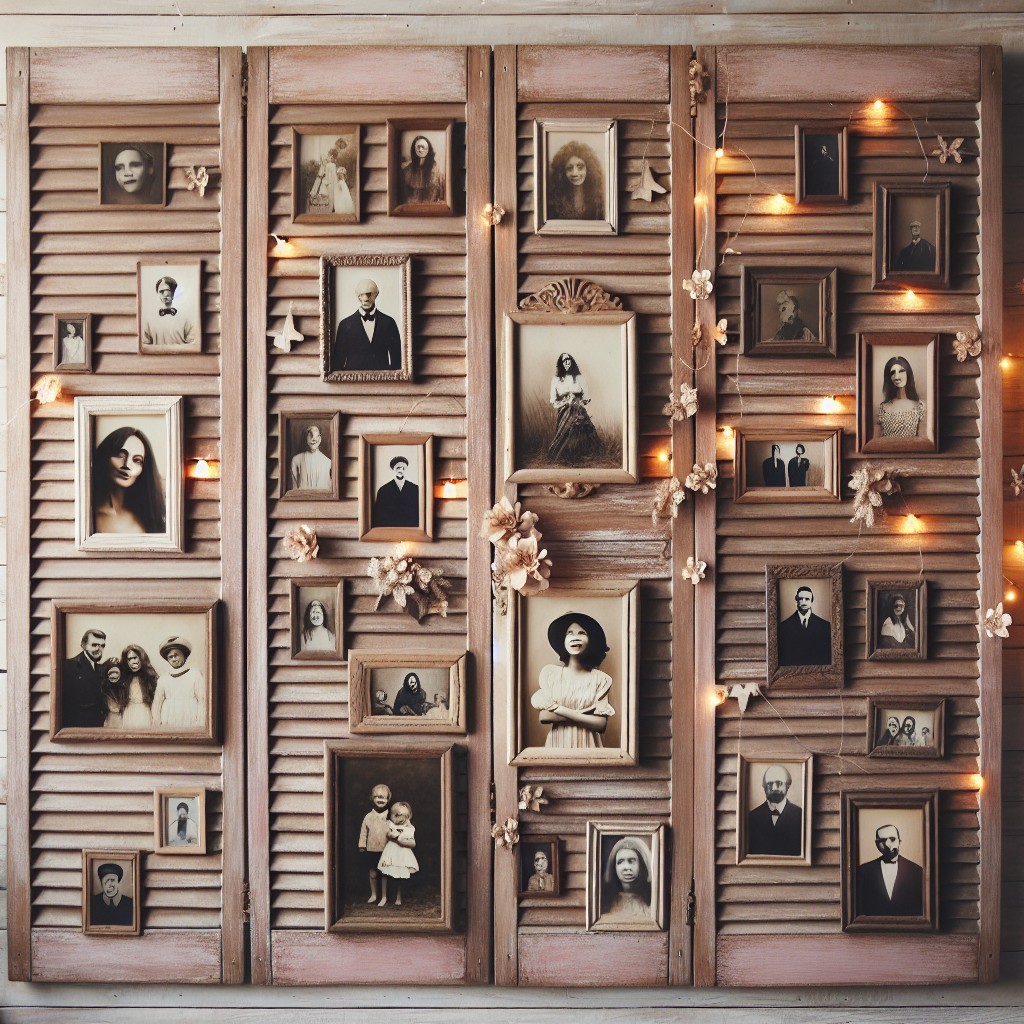
For a unique spin on showcasing cherished memories, consider this DIY project. All you need is an old shutter and some creativity. Begin by painting the shutter in a color that complements the room. This step is optional, but a little color can add a personalised touch and help your photos pop.
Next, select photographs that evoke emotions, represent milestones, or highlight travels. Think of the display as a story format to narrate your cherished moments.
Attach the photos to the shutter using small clips, which make swapping pictures easy. You could use simple clothes-pins or opt for decorative clips for a more stylized look.
Elevate the design by adding ornamental lights or cute mini banners. The result? A personalized, nostalgic photo display that adds character to your home.
Creating a Shuttered Mirror for Dramatic Effect

Utilizing an old shutter as a frame, you can effectively build a rustic mirror that serves as a striking focal point in any space. This project needs few materials: a simple mirror, a vintage shutter, adhesive, and some optional decorative items.
1. Choose Appropriate Shutter Size: The size of the shutter should correspond with the mirror that you plan to affix to it. Having some shutter overhang around the mirror can enhance the rustic appeal.
2. Prepare the Shutter: Clean the shutter thoroughly to remove any dust or grime. Sand it to reveal its vintage splendor or apply a fresh coat of vibrant paint as per your aesthetic preference.
3. Attach the Mirror: Use a strong adhesive to mount the mirror onto the shutter. Ensure it is adequately supported until the glue dries fully.
4. Decoration (Optional): You might want to add a touch of glam with decorative elements like faux flowers, beads, or rustic wire added to the shutter.
With this technique, your ordinary mirror transforms into a sophisticated piece of decor, setting a dramatic tone in your room. Properly placed, it can also make your space appear larger.
Remember, the aim is to create an accessory that reflects your style while also serving a functional purpose. Modify the steps to suit your taste, and breathe new life into your interiors with a distinctive shuttered mirror.
Decorate Shutters With Hanukkah Themed Artwork
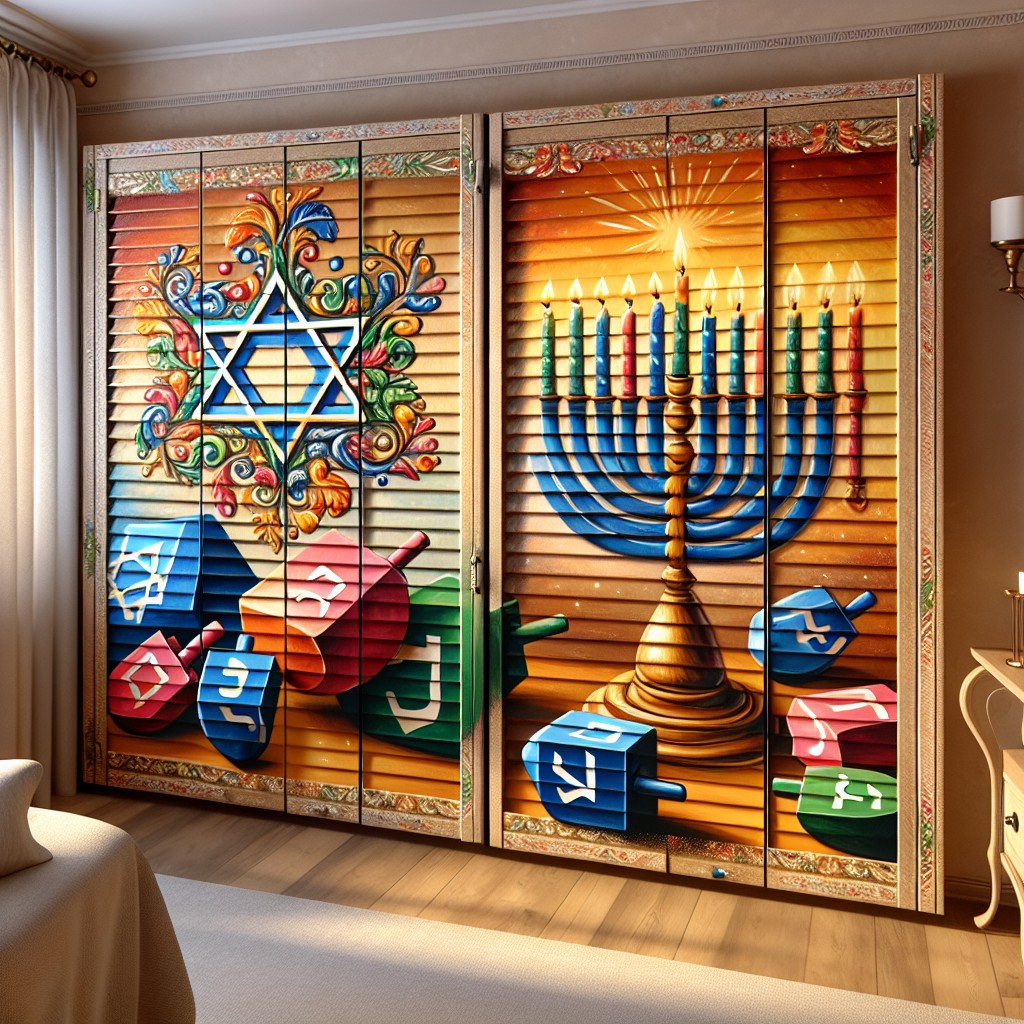
Using shutters as a Hanukkah-themed artwork canvas is a delightful way to celebrate the festival while adding charm to your home decor.
1. Choosing Your Design: Start by selecting an appropriate artwork that represents Hanukkah traditions. Symbols like the Star of David, a Menorah, or a Dreidel are popular choices.
2. Preparation: Clean the shutter thoroughly. If required, a light sand and a coat of primer can prepare the surface for painting.
3. Creating the Artwork: Use weatherproof craft paint to bring your selected design to life on the shutter. Stencils can be your friend here, especially if precise shapes are required.
4. Adding Details: After the paint dries, you can further accentuate your design with additional items like glitter or small light bulbs.
5. Display: Place the shutter in a visible spot, like near your front door or a central wall. Ensure it is securely fastened to avoid accidents.
Crisp White Shuttered Plant Hangers
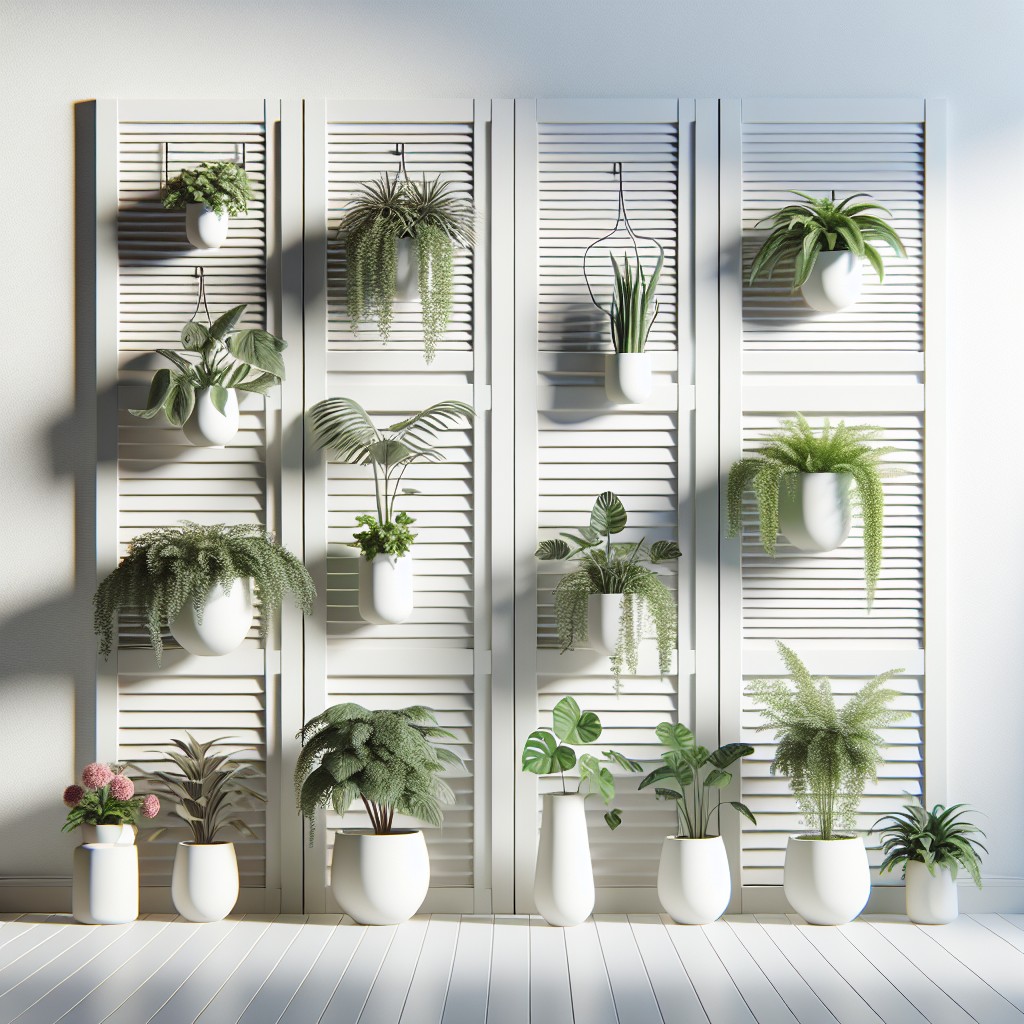
Choosing a bright, crisp white paint can immediately elevate old shutters into a sleek container for your plants, giving a fresh look while enhancing the greenery. The steps to achieve this aesthetic are quite straightforward.
First, prepare your old shutters by cleaning them thoroughly. Sand any rough, chipped areas until smooth. Apply a coat of white paint; acrylic works well as it’s durable and easy to clean. You might need a second coat for a more polished look.
Next, choose your plants. Opt for a mix of ferns, ivy, or even flowering plants to add a touch of color.
Attaching the pots is the next step. Use sturdy hooks – screw them tightly into the shutter slats. Ensure they’re secure; you don’t want your plants taking a tumble!
Hang the shuttered plant hanger on a wall that gets ample indirect sunlight. This type of wall decor could be perfect for a sunroom, the kitchen, or even a bedroom wall, immediately brightening up the space, and creating a vibrant, natural focal point.
Convert Shutters Into a Unique Mail Organizer

To commence with this, gather a couple of unused shutters and fasten them together. The next step is to vividly paint them to match your home’s color scheme. Painting not only adds an aesthetic appeal but also provides protection from wear and tear.
Choose some sturdy hooks and install them at varying heights. These will hold the mail. It’s also a good idea to attach small shelf brackets at the bottom to provide a spot for packages or other larger items.
For an added functionality, consider attaching small chalkboards to name or categorize your mail slots. This will help keep your mail organized and ensure that everyone in the household can easily find their post. And there you have it! With a few simple steps, your old shutters have now become a unique and functional mail organizer.
Romantic Vibe With Shutter Candle Holder Setup
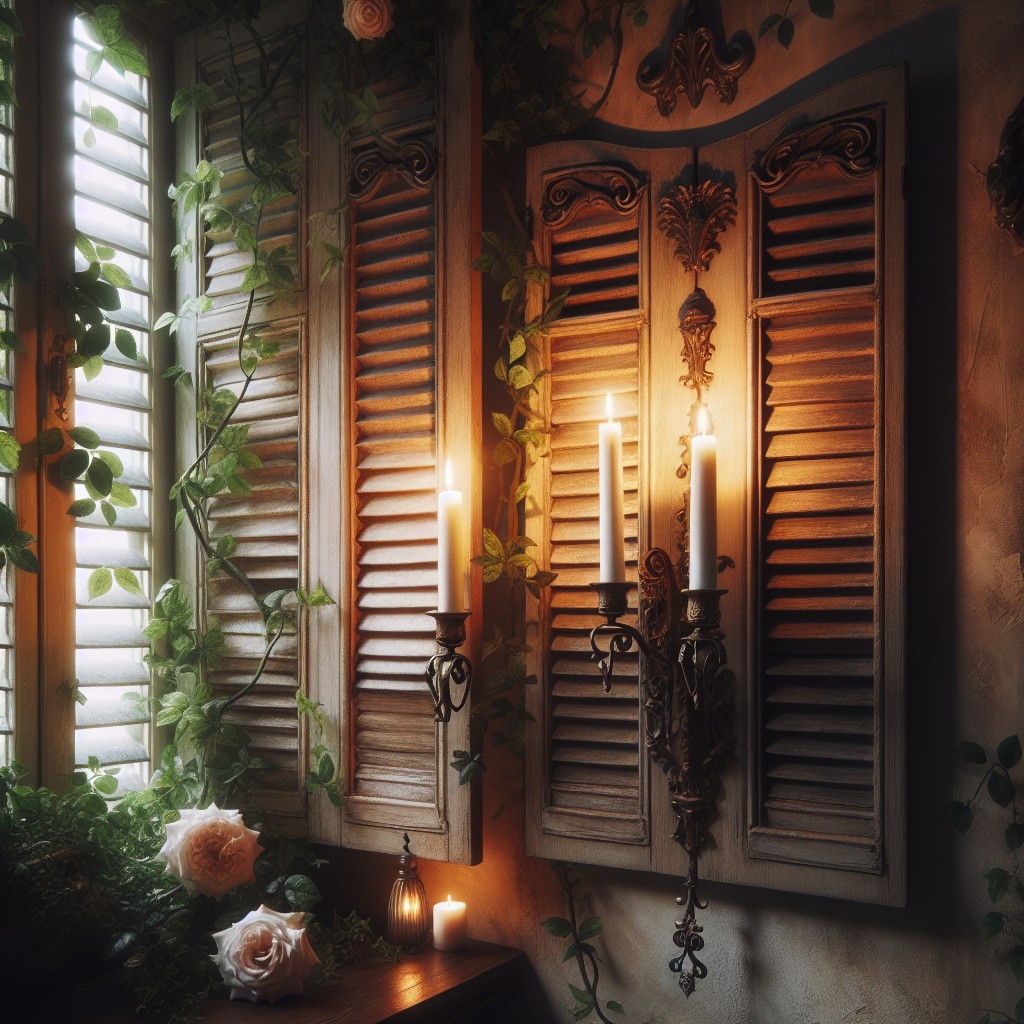
To create this charming setup, start by selecting a tall, vintage-style shutter panel. The distressed, antique look lends itself well to a romantic aesthetic.
Next, mount a variety of candle sconces at varying heights along the shutter. Use candles with a soft glow, like ivory taper or pillar candles.
Accessories play a major role in achieving the romantic feel. Consider adding climbing artificial vines or silk flowers for an enchanted, whimsical touch.
To finish it off, place the shutter on a mantel or hang it on a wall that needs a bit of love. You’re sure to create a serene, calm atmosphere with this arrangement.
With the flick of a lighter, you can transform an ordinary night into a breathtakingly romantic occasion.
Remember, safety first – never leave burning candles unattended, and ensure they are securely mounted.
Vintage Shutter Magazine Rack for Your Reading Corner
Creating a vintage shutter magazine rack promises an aesthetically pleasing functional piece for any reading corner. Here’s a simple way to craft this stylish organizer:
1. Choose an old shutter: Salvage or buy a vintage shutter with louver slats intact, this will act as holders for your magazines.
2. Prep and paint the shutter: Sand away loose paint or rough areas to ensure a smooth surface. Apply a coat of paint in a hue that complements your reading corner.
3. Opt for a distressed look if it suits your space: Not too keen on a polished look? Try a weathered finish by lightly sanding certain parts of the painted shutter.
4. Secure the shutter: Fix the finished shutter to the wall near your favorite reading chair or sofa. Ensure it’s strongly secured to support the weight of the magazines.
5. Organize your magazines: Now simply slip your magazines into the slats.
Remember, perfect positions for this piece are beside a comfy armchair, or over a side table. Aesthetics and function meld in this easy décor idea, making an inviting reading corner filled with your favorite reads.
Rustic Shutter Wine Rack for Vintage Enthusiasts
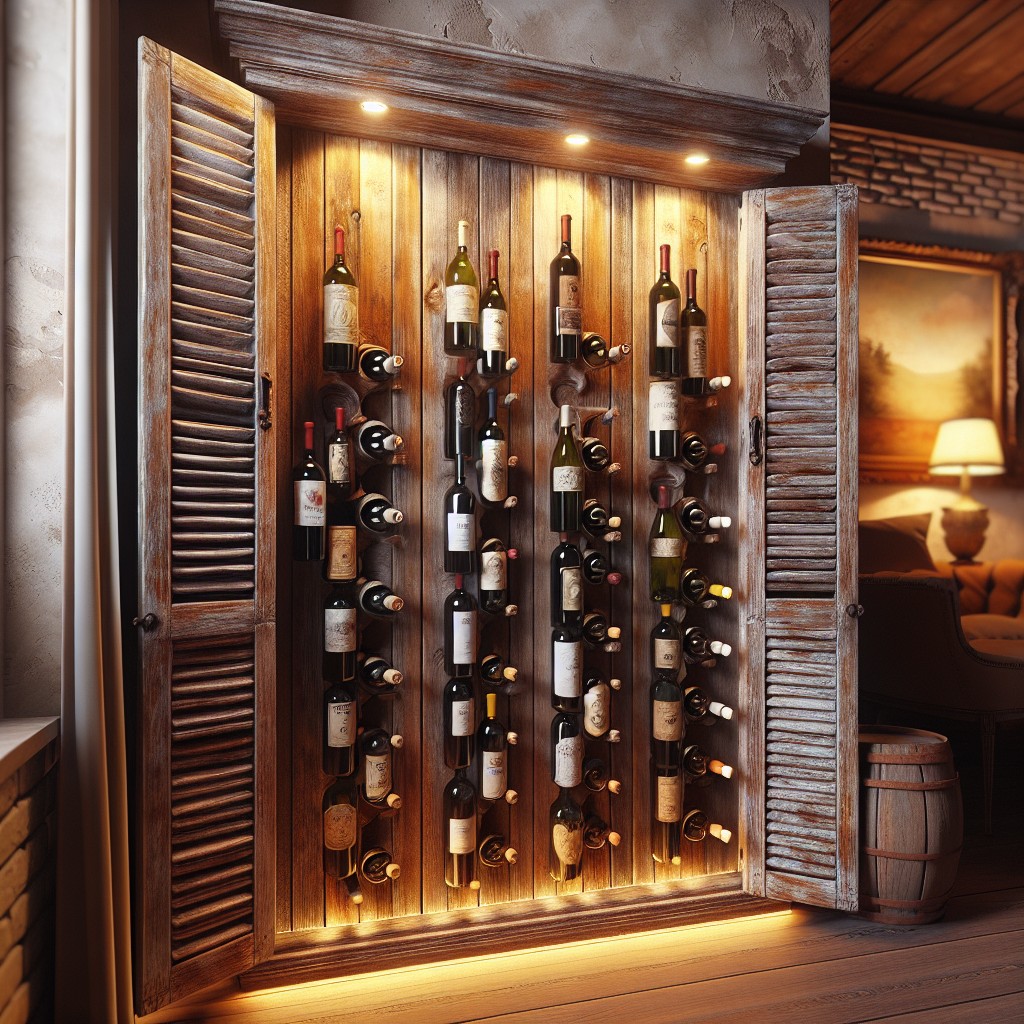
To bring a rustic appeal to your living space, consider repurposing an old shutter into a wine rack. This is a straightforward DIY project which not only showcases your love for vintage aesthetics but also provides a functional storage space.
1. Choose a sturdy shutter: The older and more distressed, the better, as this will enhance the rustic vibe.
2. Horizontal slats: They serve as the perfect holders for your wine bottles. Ensure the slats are spaced adequately to accommodate the bottles. Depending on the size of your shutter, you may fit about four to six bottles.
3. Secure the shutter: Mount it on the wall securely using appropriate hardware. Make sure it’s in a cool, dark location — optimal conditions for storing wine.
4. Enhance the aesthetic: Adorn it with a vintage metal sign or a hand-painted phrase like “Wine a little, Laugh a lot” to create a conversation piece. A string of fairy lights can also imbue it with a warm glow.
5. Accessorize: Consider adding a hook for a corkscrew or a small holder for wine glasses at the bottom of the shutter.
This project is an excellent way to combine form and function – a chic storage unit and a piece of decor that authentically represents the vintage era.
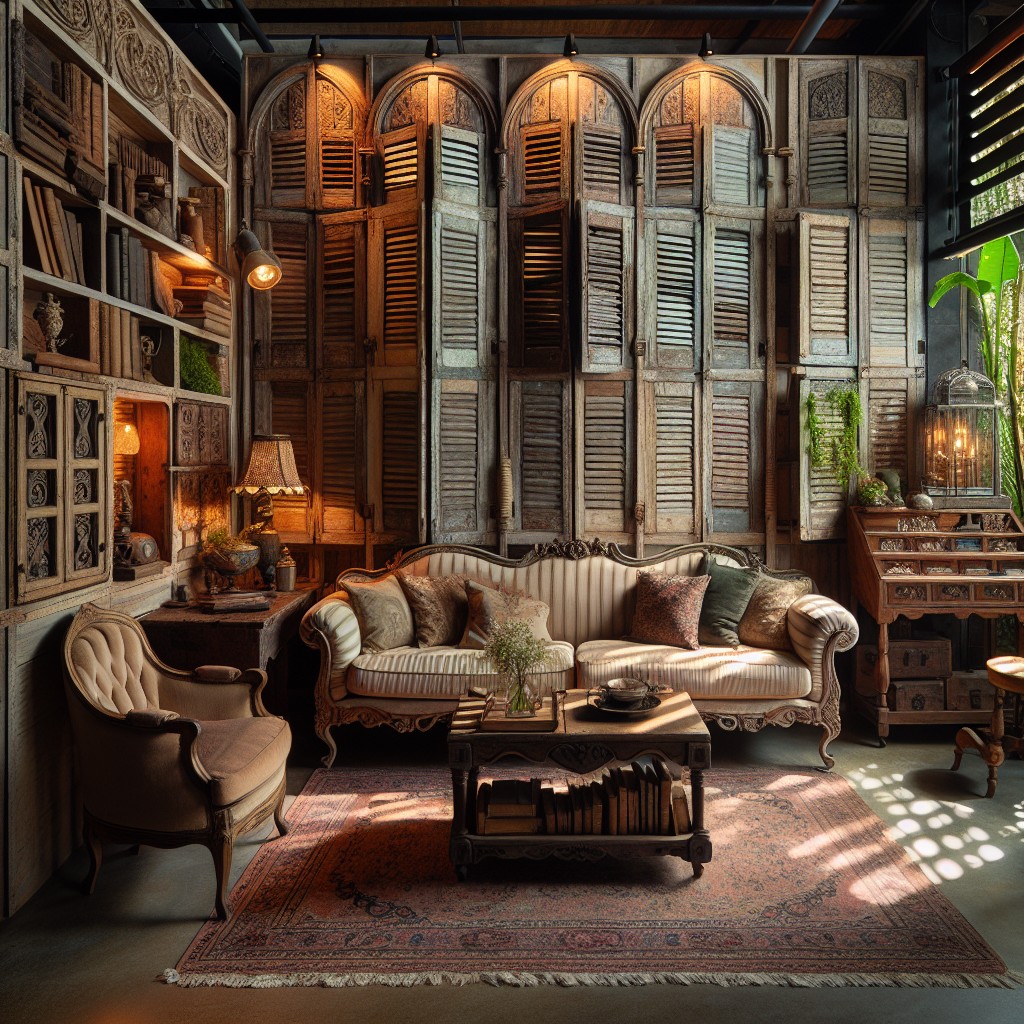
Shutter Room Divider for Small Spaces
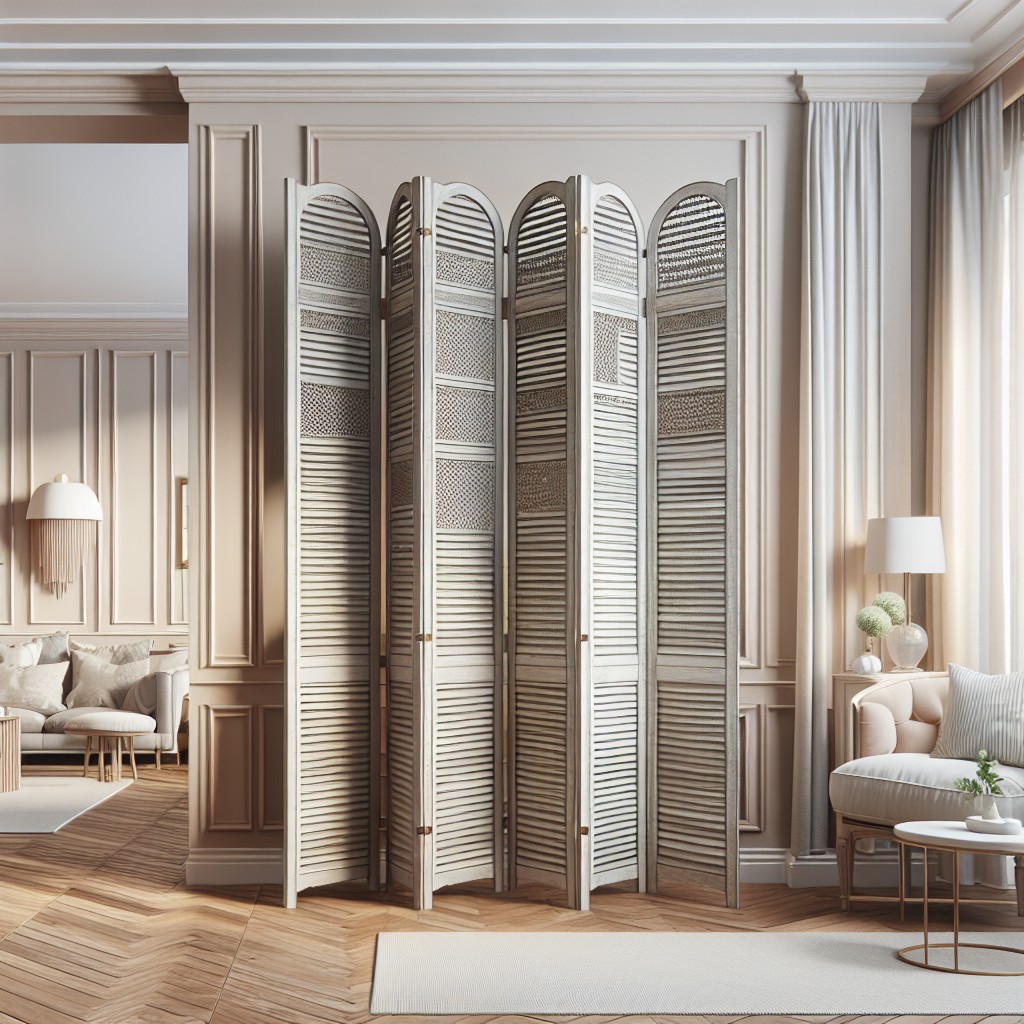
A shutter room divider is an excellent way to create privacy in small spaces without sacrificing style or natural light. It provides the perfect blend of function and artistic appeal.
Creating it only requires a few key steps:
- Collect old shutters: Thrift shops and yard sales are good places to find these at a reasonable price.
- Prepare the shutters: Clean them well and if needed, paint them for a fresh look.
- Secure the shutters together: Based on the desired size, join the shutters together using hinges.
- Position your divider: Stand it up in the desired area. It’s an excellent option for studio apartments or open-plan spaces.
Remember, the primary goal is to achieve visual separation and define distinct living areas within one room. The rooms can be rearranged anytime as it’s portable and flexible. This is not only a charming decor idea but it also provides small spaces with a sense of comfort and personal space.
Create a Shutter Lantern for an Antique Vibe
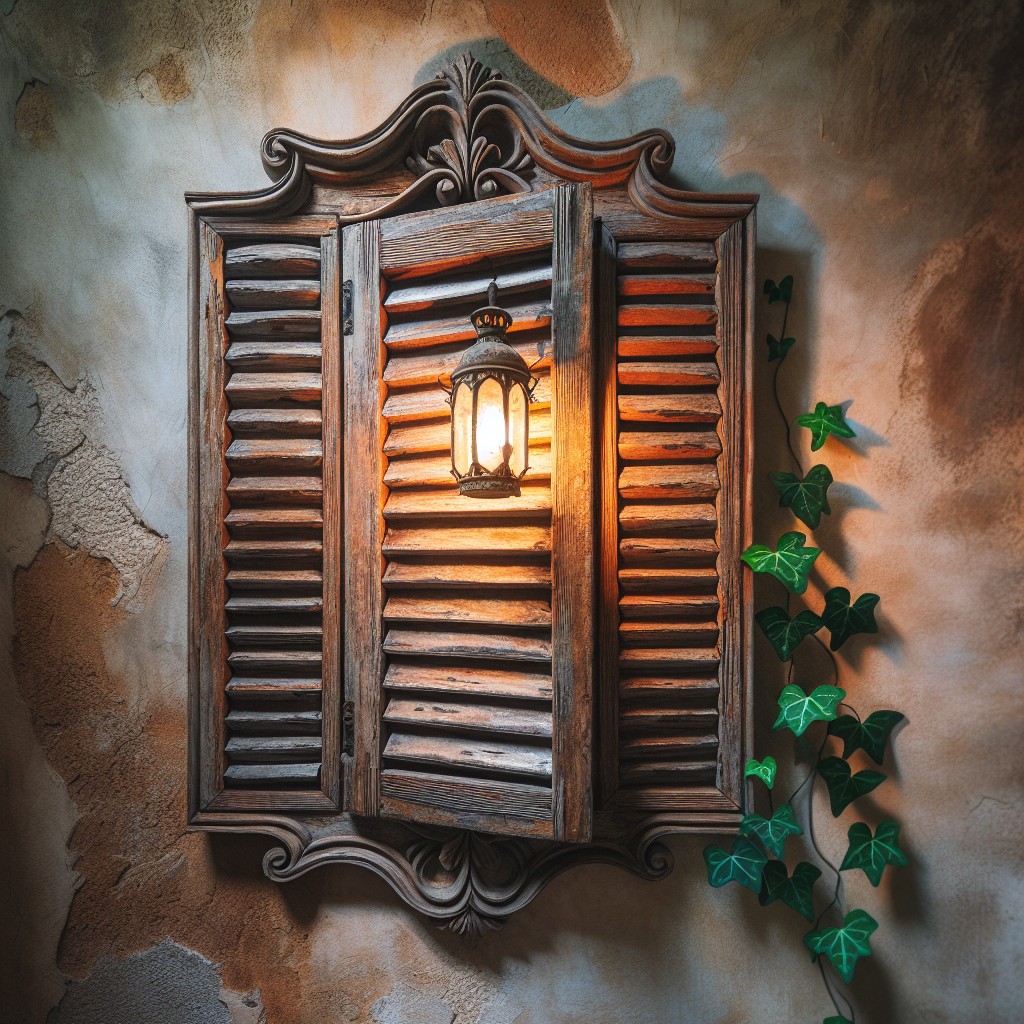
Start by finding a pair of shutters with enough height to mimic the look of a tall lantern. Using sandpaper, roughen up the shutters to bestow an aged and distressed texture. Apply a dark wood stain, blotting off the excess to reveal the underlying grain pattern, thus enhancing the antique feel.
Next, join the prepared shutters at their tops and bottoms with metallic braces for support. Inside this framework, position an oversized candle holder with a chunky candle or, alternatively, use battery operated lights for an always-lit ambiance.
This project can serve as a one-of-a-kind ambient light source for your home or garden. To further amplify the antiquated appeal, adorn the lantern with vintage accents, such as burlap bows or old typewriter keys. This not only speaks to your personal stylistic preferences, but also adds personality to your lantern.
Keep in mind, the beauty of this project lies in its versatility. It can thrive in numerous settings – from a cozy reading nook to a rustic garden setting; whatever aligns with your decor aesthetic.
Decorative Fireplace Cover With Old Shutters
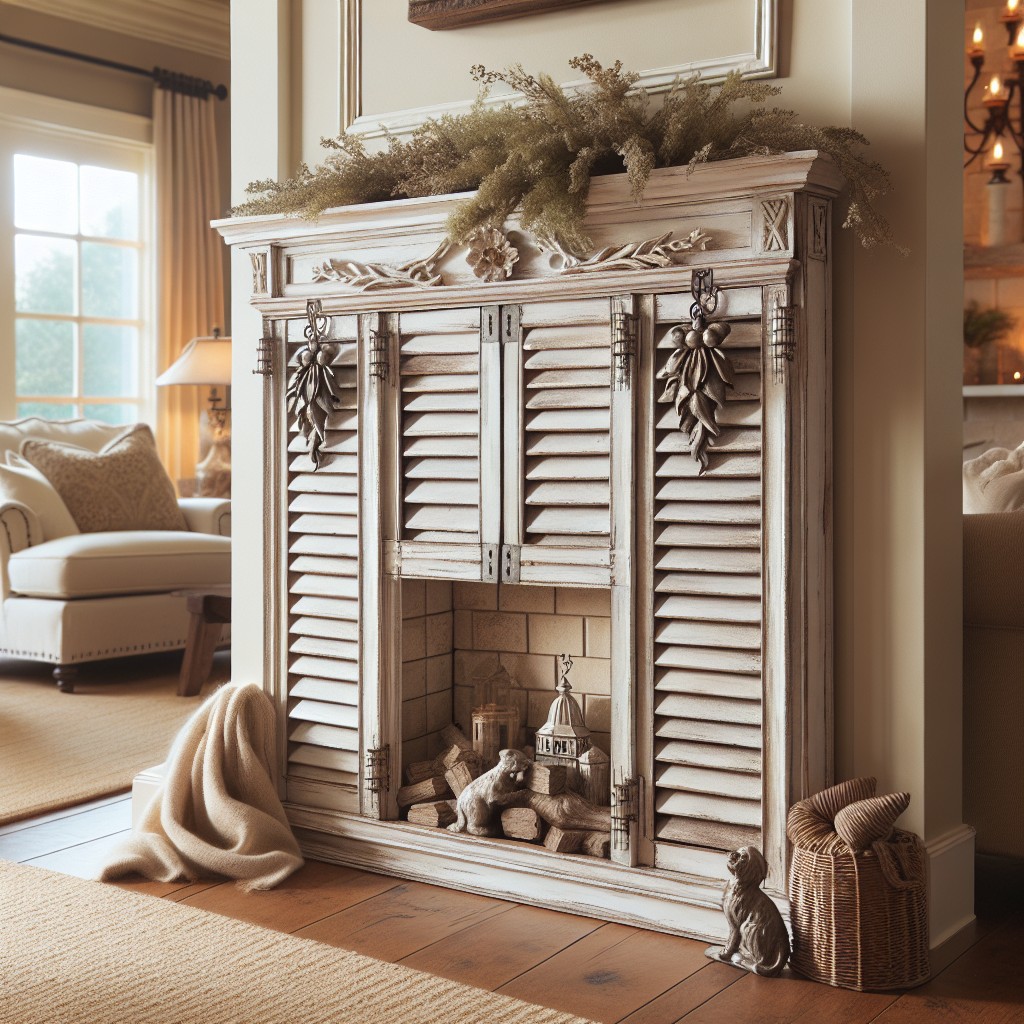
Nothing brings a room together quite like a toasty, inviting fireplace- but when it’s not in use, it can seem somewhat stark and bare. An innovative approach to this issue is repurposing old shutters as a decorative fireplace cover.
1. Choose the Right Shutters: Begin by sourcing a few old shutters that are large enough to cover your fireplace opening. Look for ones with character – maybe peeling paint or interesting detailing.
2. Clean and Prep: Once chosen, give them a proper wash to remove any loose dirt or dust. Sand them lightly if needed to achieve a uniform surface, while preserving their rustic charm.
3. Assemble: Fasten shutters together using hinges to ensure stability. The number you’ll need to connect will depend upon the width of your fireplace.
4. Decorate: Now is the exciting bit! Let your creativity flow. Perhaps a coating of muted color paint or a distressed finish will fit your décor. Alternatively, maintain their timeworn look for a rustic aesthetic.
5. Position: Finally position your assembled and decorated shutter frame in front of your unused fireplace for a stylish and charming focal point.
By effectively making use of old shutters, you’ve not only gained a captivating piece of decor, but breathed new life into a dormant household feature. Plus, it’s a simple task you can undertake in one weekend! Happy decorating!
Shutter Christmas Tree for Holiday Decor
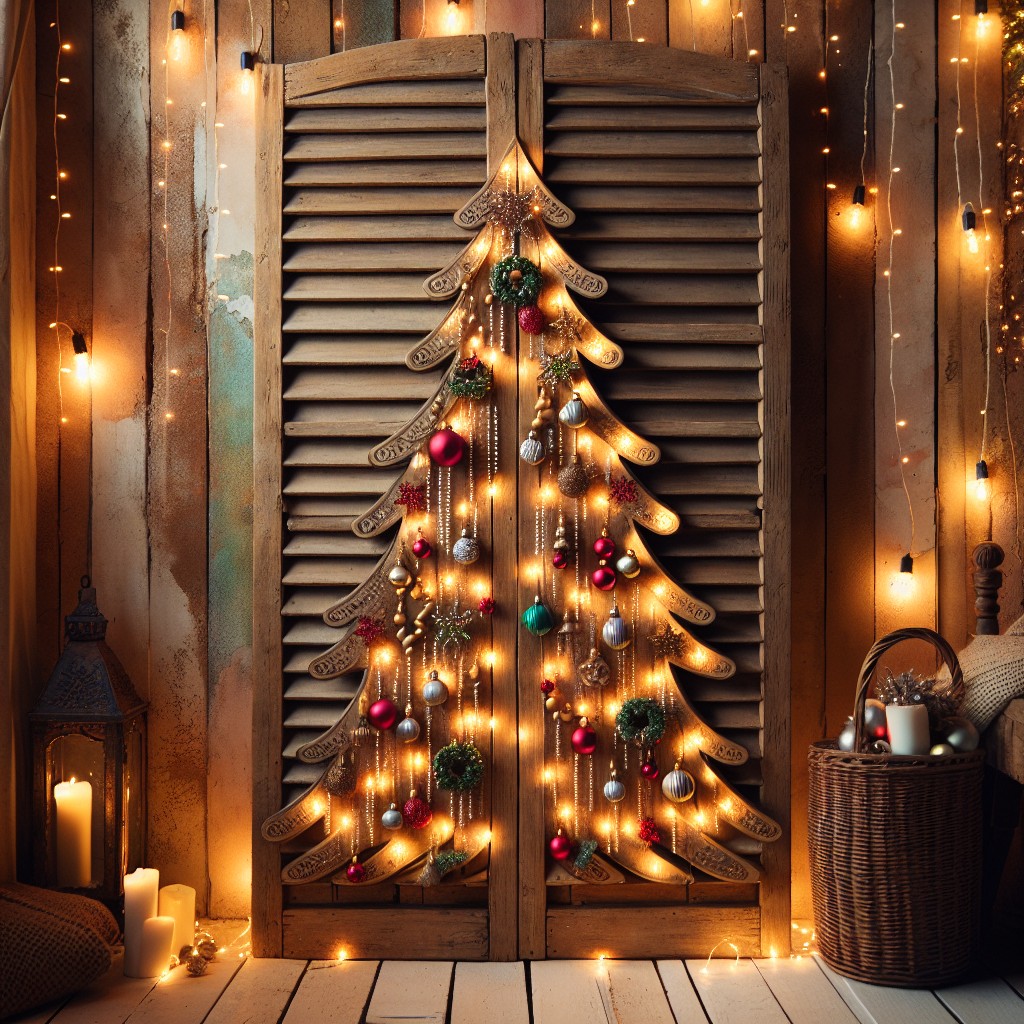
A delightful spin on the traditional Christmas tree, this approach transitions discarded shutters into a festive holiday feature. Follow the few easy steps down below to create your unique Shutter Christmas Tree.
1. Start by selecting three or four shutters in varying sizes. These will form the ‘branches’ of your tree.
2. Arrange them from largest at the bottom to smallest at the top to mimic a concise, natural evergreen shape.
3. Use strong adhesive or screws to fix shutters together; reinforcing with brackets at the back contributes to stability.
4. Once assembled, paint the shutters in a color of your choice – traditional green, dazzling white, or a bold red are fine choices for the season.
5. Add a liberal sprinkle of fairy lights or staple on novelty Christmas ornaments for a more festive pop.
6. To top the tree, a vintage star or an old doorknob can provide a charming and rustic touch.
Remember, the concept is customizable, and you can pick colors or ornaments fitting your overall holiday theme. This is a stylish, eco-friendly alternative that adds a touch of repurposed chic to your Christmas deco spree.
Creating Kitchen Cup Holder With Shutters
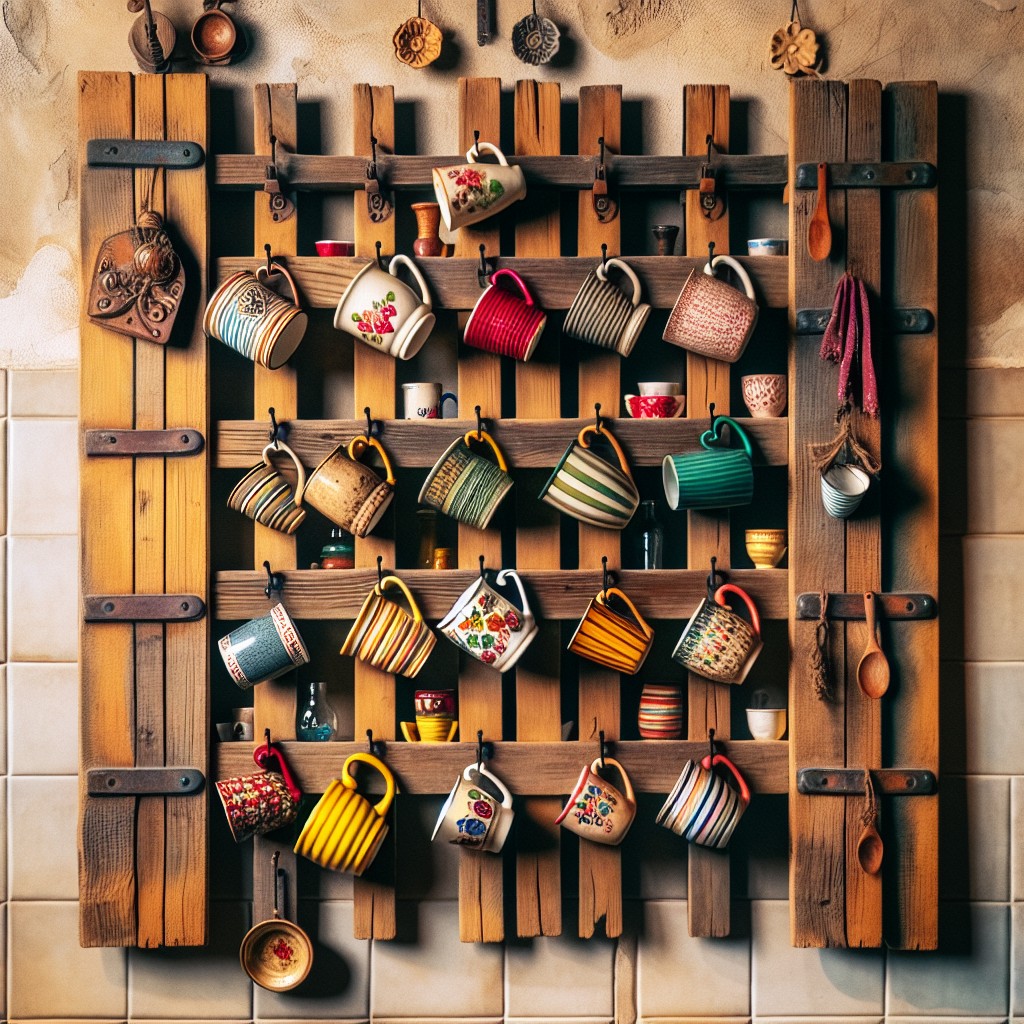
To successfully transform shutters into a kitchen cup holder, you must first ensure your shutter is clean and in good condition. For a rustic look, let its natural weathered finish shine, otherwise, a lick of paint to compliment your kitchen theme could spruce it up beautifully.
Begin by locating the studs in your kitchen wall where you intend to hang the shutters. This ensures a sturdy setup that can sustain the weight of your kitchenware. With the help of a level, this can be done both accurately and quickly.
Fasten the shutter securely onto the wall using appropriate mounting screws. Some might prefer directly attaching cup hooks to the front side of the shutter slats, while others may find attaching a small piece of wood to the top of the shutter helpful. This can create a little shelf for extra storage – a perfect spot for tea tins or your favorite cookbooks.
Select hooks that complement your shutter and screw them securely onto the shutter slats. Ensure the spacing is enough to hold your cups snugly without them crowding each other.
In no time, your shutter will be transformed into this beautiful and practical kitchen item holder, enhancing the rustic charm of your cooking space.
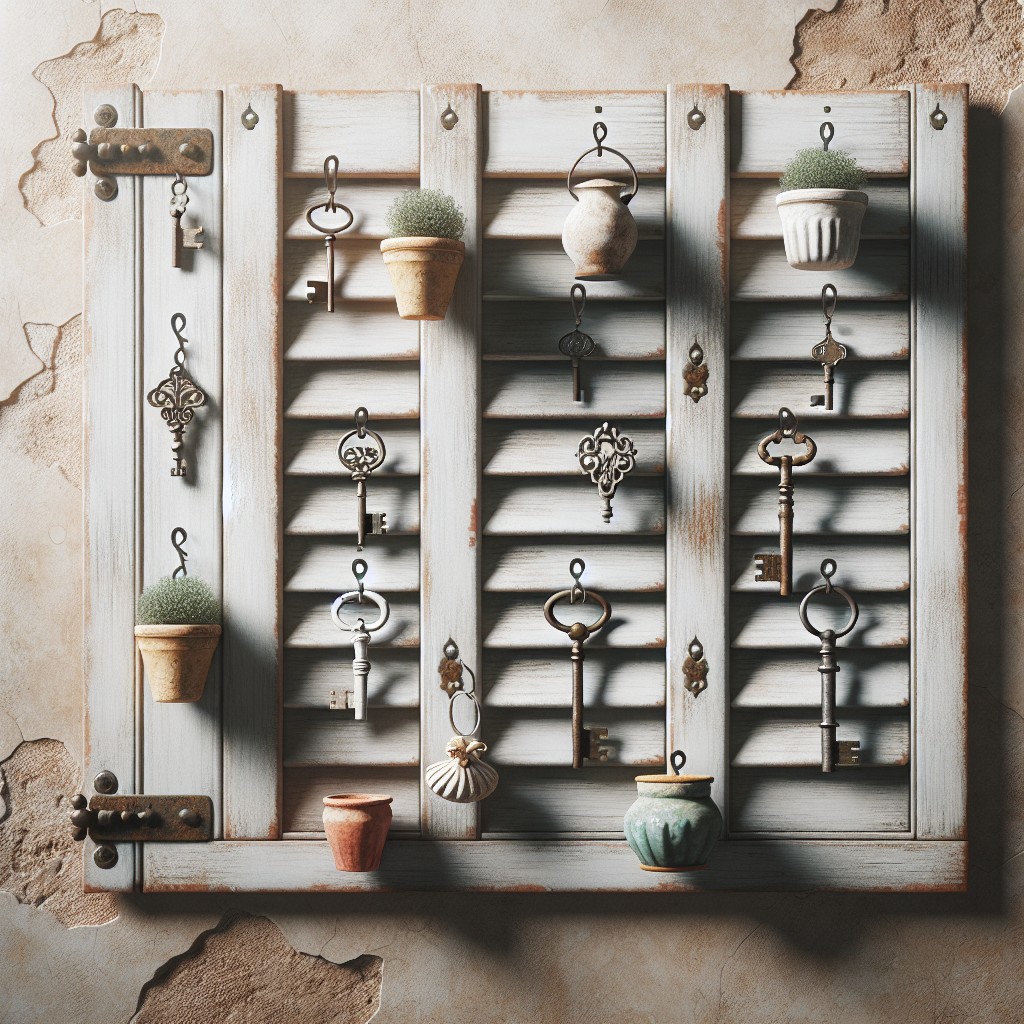
Cute Shutter Mini Garden for Small Potted Plants
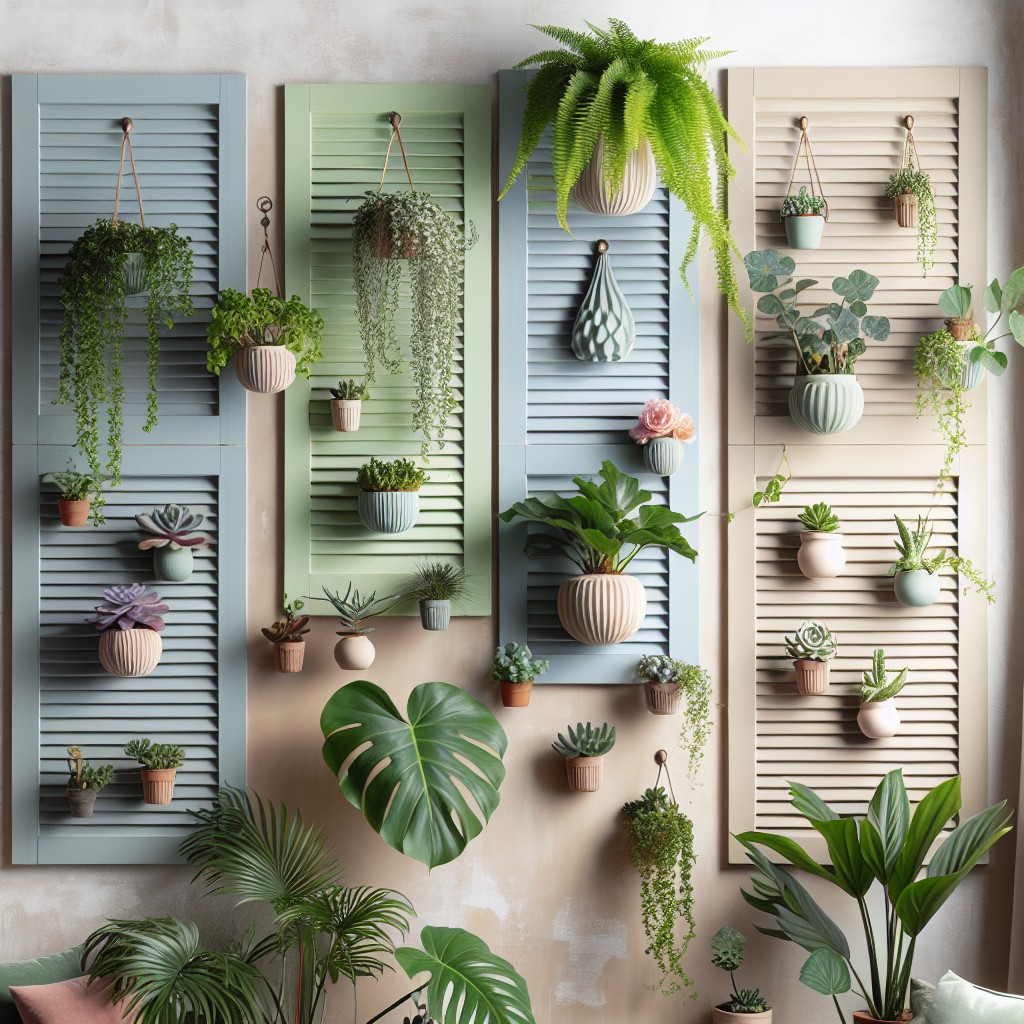
Start by selecting a well-used, rustic shutter that complements your decor. Next, measure and mark spaces evenly across where the pots will hang. For this, choose small, colourful pots to add vibrancy. Then, screw in sturdy hooks according to your markings.
Now, onto the green part, succulents are a fantastic choice given their size and low maintenance. However, you could also opt for air plants or mini foliage varieties that thrive indoors. Place each potted plant on the hooks, ensuring a secure fit.
This mini garden is versatile and perfect for apartments or small spaces. It’s not just attractive, but also adds a pop of nature to your immediate surroundings. An added plus – it’s a great conversation starter! The vertical design utilizes space smartly while affording an alluring spectacle of greenery. The overall aesthetic defines ‘rustic charm meets urban chic’. When designing your mini garden, customization is key. Get creative with pot colors, plant options, even the shutter type and colour.
Create a Coastal Look With Painted Shutter Decor
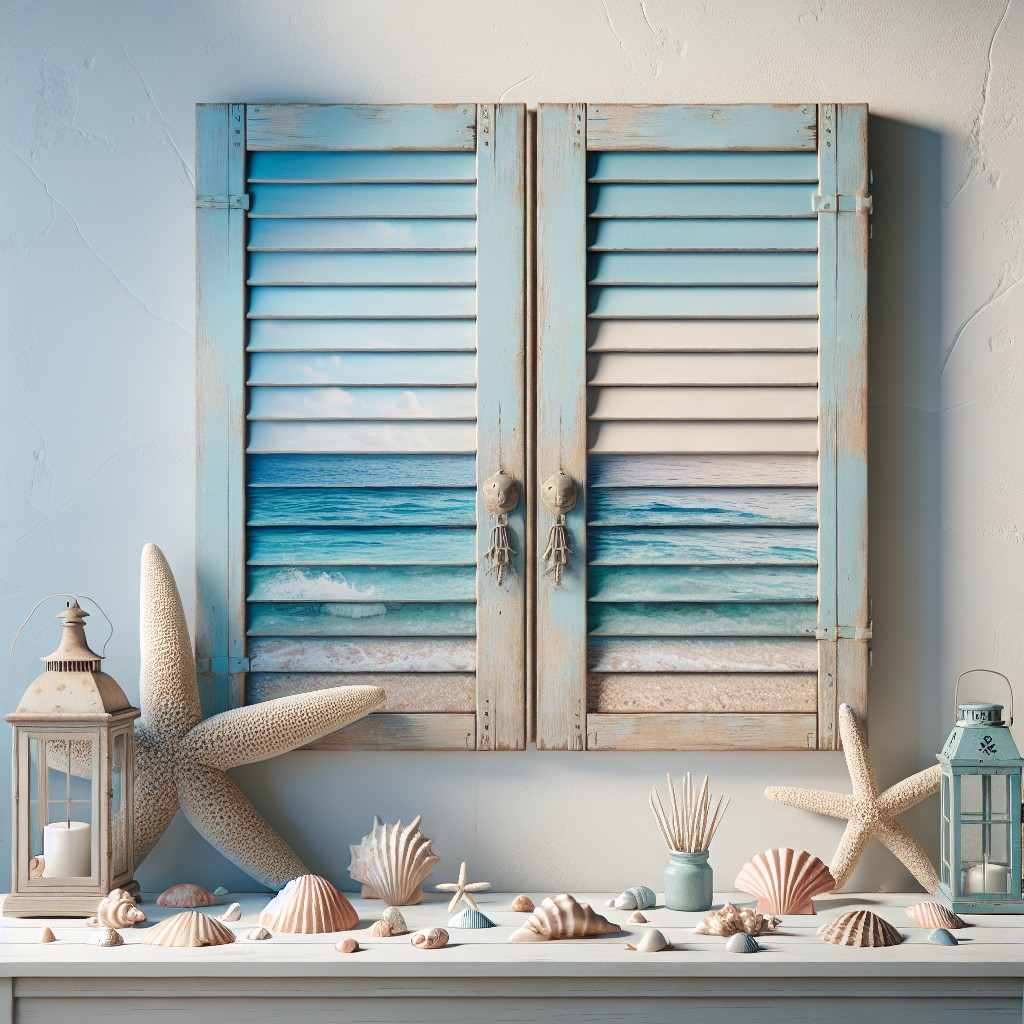
The coastal vibe offers a relaxing and serene atmosphere. Choose shades of blue, white, and sand for painting shutters to generate a seaside ambiance. The hues should reflect the sky, sea, and beach respectively. Light distressing of paint grants a weathered look, enhancing the coastal feel.
An interesting approach is to display seashells, coral, or starfish on the shutter blades. These pieces can be affixed with a hot glue gun. If you’d like to keep things simple, a single prominent nautical piece like a ship wheel or anchor can serve as a focal point.
Maintenance is key when decorating with painted shutters. Ensure the wooden shutters are properly treated against humidity and pests. Regular dusting will keep colors vibrant and display items clean. Remember to repaint when the color starts to fade.
With these practical points, achieve an evocative seaside charm right from the comfort of your home.
DIY Shutter Towel Rack for a Country Bathroom
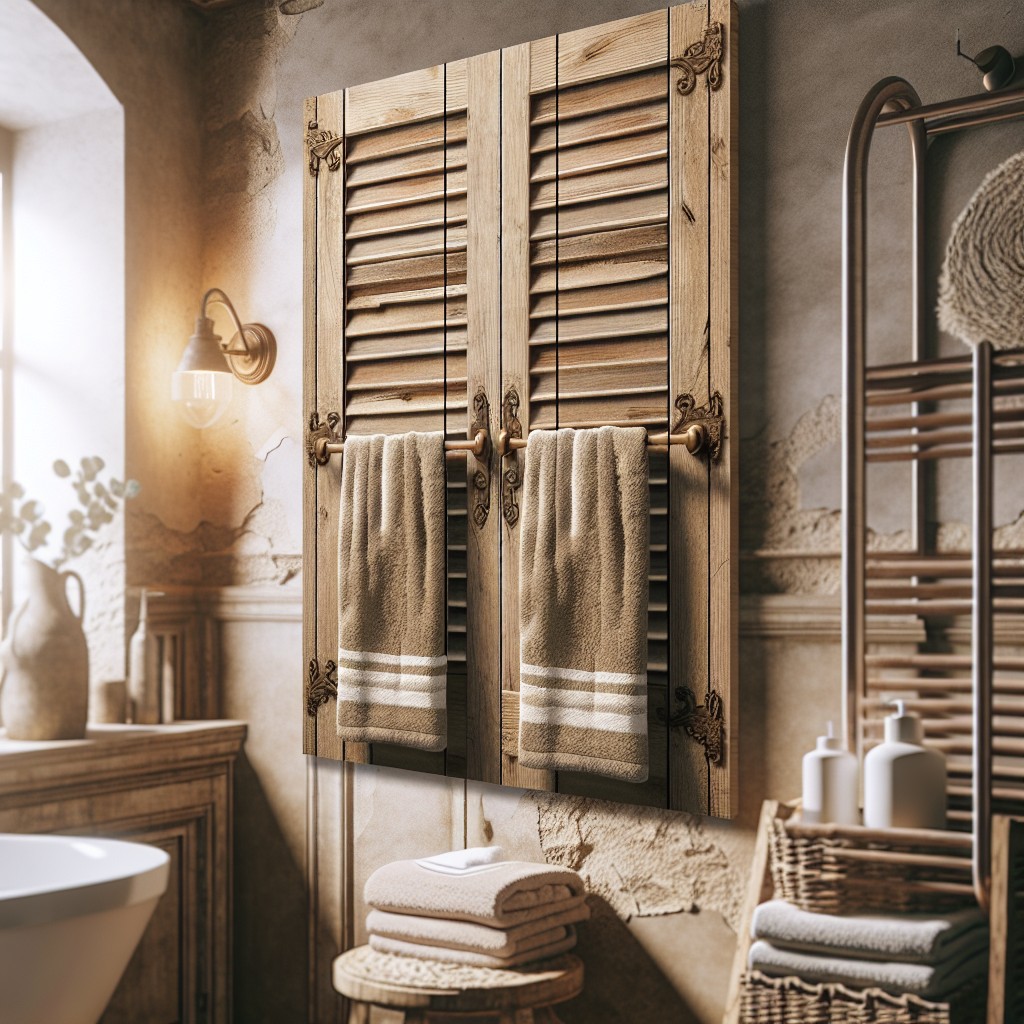
Start by selecting a shutter that complements the color scheme of your bathroom. It could be rustic, weathered or freshly painted, suited to your style. Ensure it is sturdy enough to hold towels. Attach this shutter directly to the bathroom wall using standard wall brackets for support.
Next, screw in sturdy hooks at evenly spaced intervals to hold your towels. Hooks should be rust-resistant to withstand moisture. Position them either vertically down one side for larger towels or horizontally across for smaller hand towels.
To add flair, consider adorning your new towel rack with a rustic sign, textile bunting, or even a small shelf for often-used toiletries. Sprucing up this functional piece creates visual interest and enhances its charm. Your new, country-style towel rack adds functionality while emanating the warm, homey vibes of bathroom décor.
Remember always to double-check the stability before use as wet towels can be heavy. This DIY project is a fun way to recycle old shutters and customize your bathroom decor to your liking.
Old Shutters As Indoor Window Awning
Indoor window awnings can achieve a rustic look by repurposing old shutters. Start by measuring the width of your window to determine the size of awning needed. Choose a pair of shutters that spans the window when placed side-by-side. Paint them in a color that complements your interior decor or leave them as is for a more distressed look.
The next step is to build the frame, which will connect the two shutters and give them a “V” shape. Attach them to a wooden board cut to the window’s width and fasten with screws or nails. To hang the awning, fasten sturdy metal brackets to the wall above your window. Attach the assembly to these brackets, making sure it is secure. The result is an interesting visual touch for your room that also adds an element of privacy.
When decorating the awning, a box of flowers or a string of lights can add charm. Remember, less is more; the awning is already an attraction, and over-decorating may detract from its appeal.
Farmhouse Styled Shutter Clock Decor
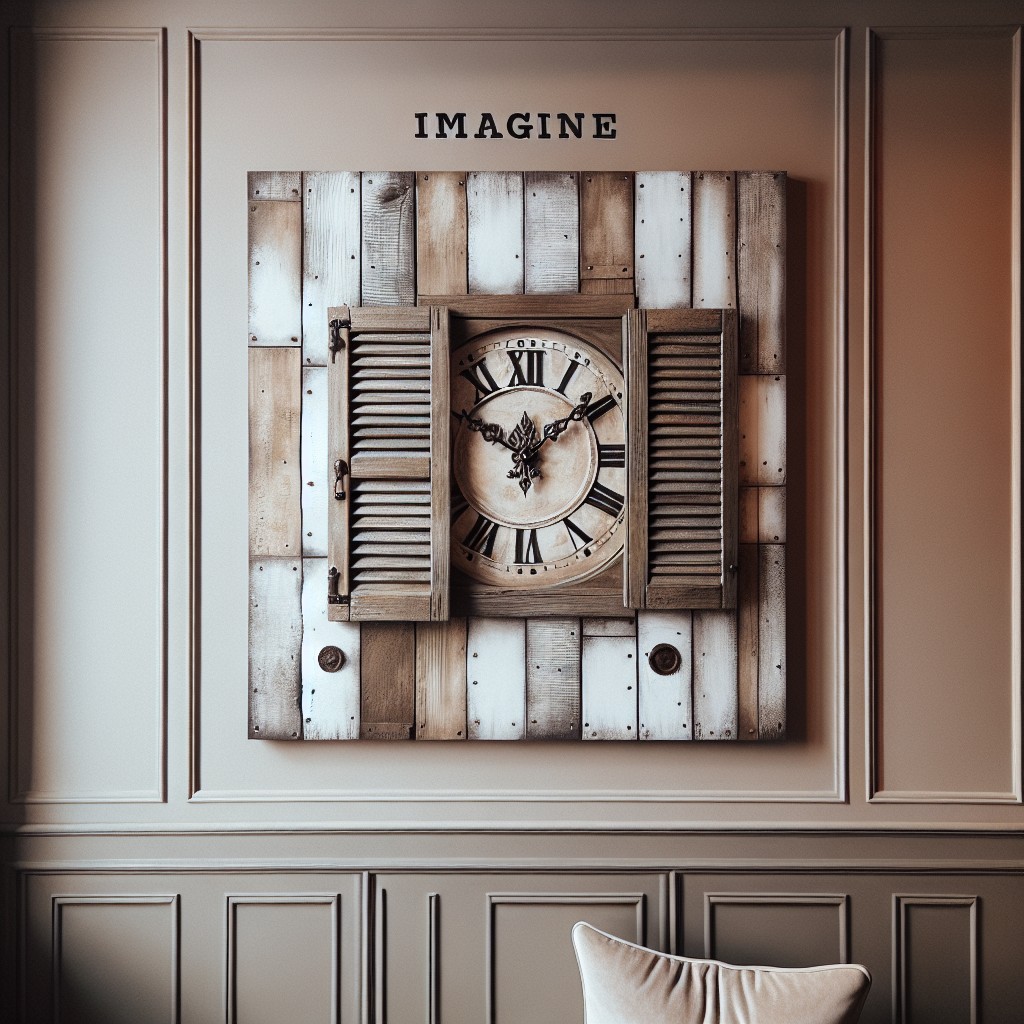
To bring the rustic charm of the farmhouse to your home, a shutter clock is a perfect choice. It’s visually captivating and easy to create.
1. Gather Materials: Find a vintage shutter, a clock set, and your preferred paint. Look for a medium-to-large shutter so the clock fits nicely.
2. Prepare Shutter: Clean your shutter thoroughly and apply paint if desired. A distressed finish often matches farmhouse decor.
3. Align Clock: Identify the center of the shutter. Attach the clock set precisely for an even look.
4. Hanging the Clock: Secure the clock to your wall using appropriate hardware. Always hang it at eye level for optimal aesthetic appeal.
Remember, this element adds character to any room. Consider it for your living room, kitchen, or hallway for a touch of practical, farmhouse charm.
Functional Shutter Wall Hook Rack
Creating this masterpiece is quite simple yet yields strikingly impressive results. An old shutter breathes a new life as a functional wall hook rack after a quick paint touch-up. This DIY project has three main components – the shutter, hooks, and paint.
Ensure the shutter is clean and dry before applying a coat of paint matching your room’s color scheme. After the paint dries, attach hooks evenly spaced across the shutter. It’s important to ensure strong attachment to hold substantial weight.
Placement of this functional shutter wall hook rack can vary based on your preference. The entryway is an ideal spot to hang coats and hats, or in the bathroom for hanging towels.
Try adding various types of hooks for a playful touch, while contrasting colors could add a pop to the overall decor. This practical solution helps to keep your rooms tidy and adds a touch of elegance simultaneously. Remember, it’s all about playing with colors and styles while keeping the functionality intact.
Ideas Elsewhere
- https://www.reinventeddelaware.com/what-to-do-with-old-shutters/
- https://www.digsdigs.com/how-reuse-old-shutters/
- https://petticoatjunktion.com/projects/reuse-old-shutters/
- https://warmcozyhome.com/best-old-shutter-decor-ideas/
- https://homebnc.com/best-old-shutter-outdoor-decor-ideas/
- https://www.decorhomeideas.com/old-shutter-decor-ideas/
Read More
 15 Kitchen Garden Ideas for a Fresh and Fun Home Cooking Experience
 Kitchen Table Poly: Understanding Non-Hierarchical Relationships
 What Color Paint Goes with Brown Granite: Matching Tips for Your Home Décor
 Watch Cutthroat Kitchen Online Free: A Basic Guide to Free Streaming Platforms
 8×12 Prints Size: Understanding and Utilizing in Interior Design